Are you tired of uploading videos to YouTube only to find they look grainy, pixelated, or just plain awful? As a content creator with 5 years of experience using Premiere Pro for editing YouTube videos, I’ve been there.
The good news? With the correct premiere pro export settings for YouTube, you can make your videos shine and keep your audience coming back for more.
In this article, I’ll share the premiere pro export secrets that will take your YouTube content from amateur to pro-level quality in no time.

Premiere Pro Free Trial
You can download Premiere Pro here which comes with a free trial.
Guide to the Best Premiere Pro Export Settings for YouTube
By following these steps, you will get the best video quality, file size, and ensure your videos play smoothly on YouTube. We will break down each step into easy parts so you can understand every setting, including social media aspect ratios and max resolutions to use.
You’ve done the hard work creating your video in Adobe Premiere Pro now it’s time to export to your YouTube channel. Let’s go!
You can download Premiere Pro here.

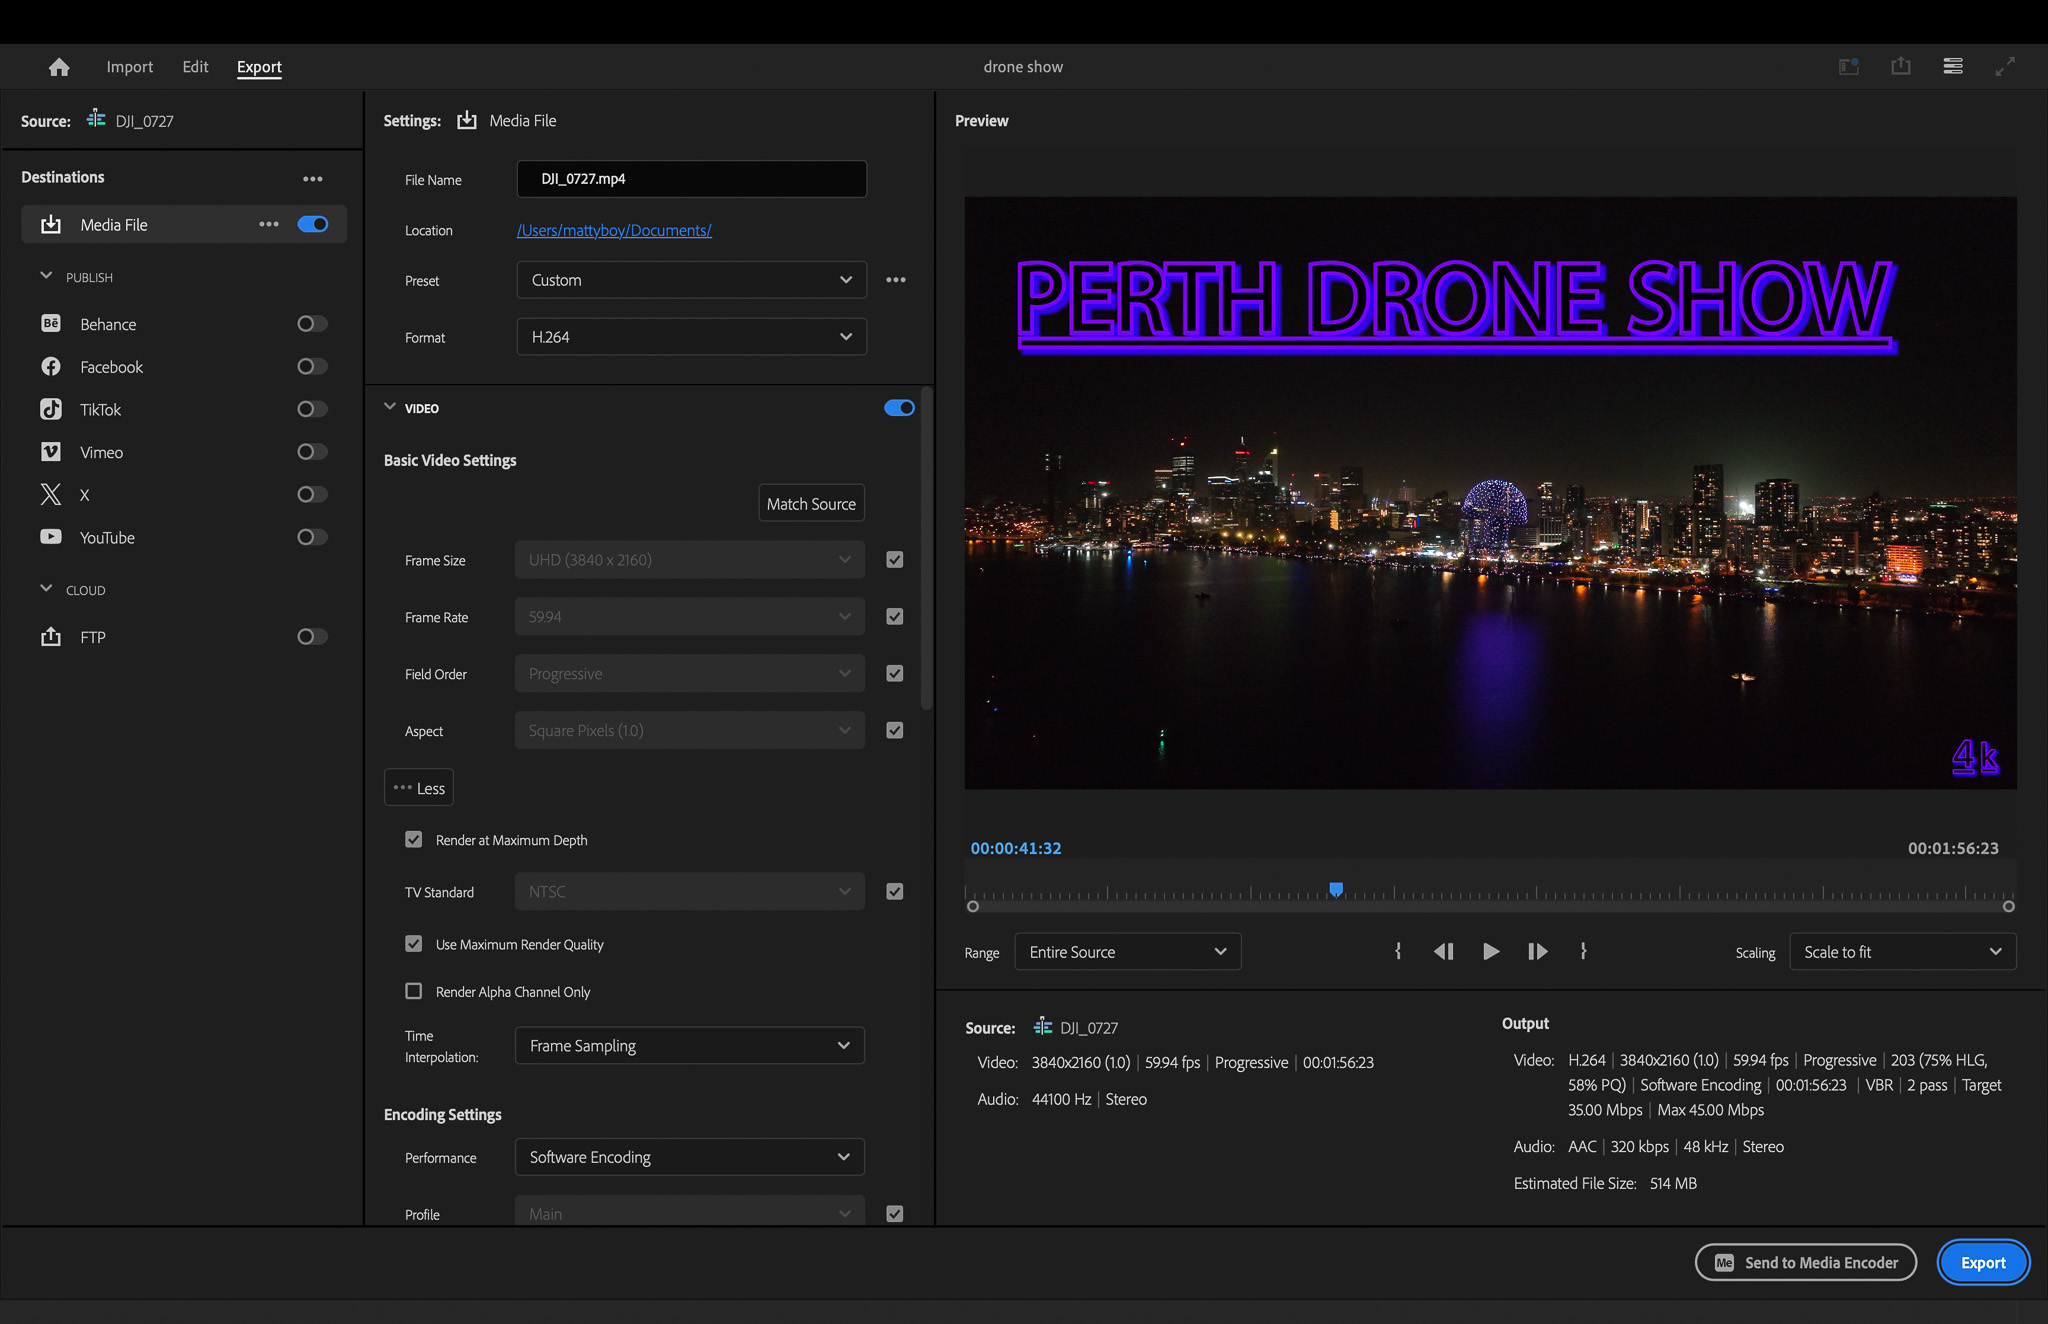
1. Format: H.264 or H.265 (HEVC)
H.264 is the most widely used video codec and is compatible with almost all devices and platforms. It’s generally the best choice for 1080p content. H.265 (HEVC) offers better compression, especially for 4K footage, resulting in smaller file sizes without sacrificing quality.
However, it requires more processing power to encode and decode, and may not be supported on older devices.
2. Resolution
Matching your source footage is crucial for maintaining quality.
1920×1080 (Full HD) is still the most common resolution for YouTube content, offering a good balance between quality and file size.
3840×2160 (4K UHD) provides superior quality but requires more bandwidth and storage.

3. Frame Rate
Matching your source footage ensures smooth playback. Common frame rates are:
- 24 fps: Cinematic look, often used for narrative content
- 30 fps: Standard for most video content
- 60 fps: Ideal for fast-moving content like sports or gaming videos
4. Field Order
Progressive scanning is the standard for digital video and should always be used for YouTube content. It displays the entire frame at once, resulting in clearer images, especially during motion.
5. Profile
The High profile offers the best quality-to-file-size ratio for H.264 encoding. It supports 4:2:0 chroma subsampling up to 8-bit color depth.
6. Level
- Level 5.1 is suitable for 4K content
- Level 4.2 is appropriate for 1080p.
These levels determine the maximum bitrate and frame rate for the video.
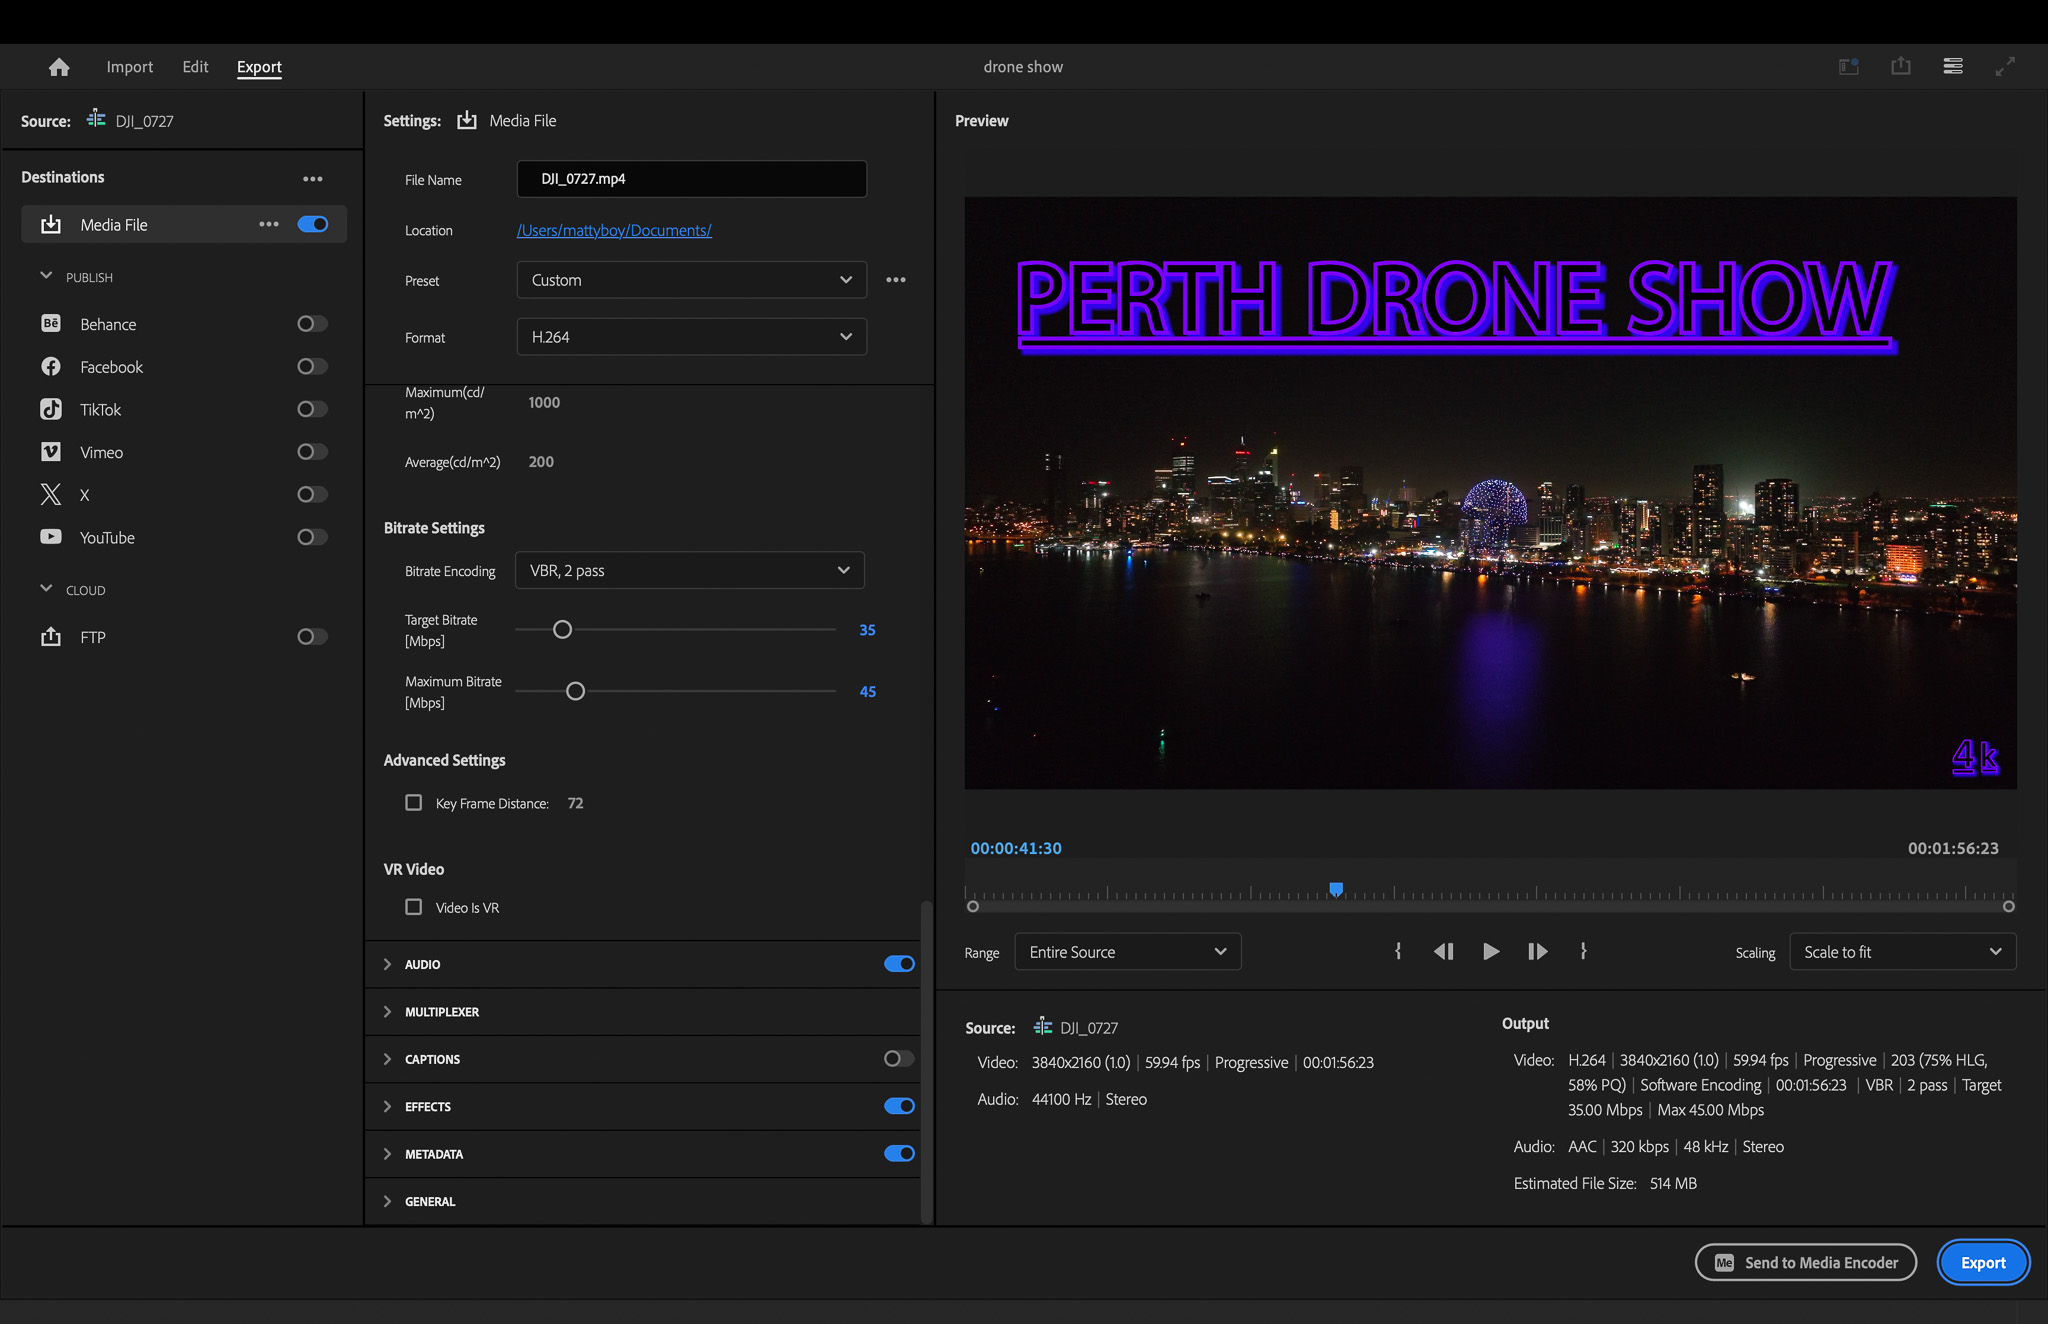
7. Bitrate Encoding
Variable Bit Rate (VBR) with 2 Pass encoding allows for more efficient use of data. It allocates more bits to complex scenes and fewer to simpler ones, resulting in better overall quality for the file size.
8. Target Bitrate
The recommended bitrates ensure good quality while keeping file sizes manageable:
- 1080p: 16-20 Mbps
- 4K: 35-45 Mbps
Setting the maximum bitrate to 1.5x the target allows for handling more complex scenes without excessive file size increase.
9. Use Maximum Render Quality
This setting enables higher-quality scaling and compositing, which can improve overall video quality, especially when working with mixed resolutions or complex effects.
10. Use Maximum Bit Depth
This preserves colour information during rendering, reducing banding and improving overall image quality, especially in gradients and areas with subtle color variations.
11. Use Frame Blending
Generally left unchecked to preserve original motion. It’s only useful when you’ve applied slow motion effects and want to create smoother transitions between frames.
12. Colour
- Colour Space: Rec. 709 is the standard for HD and 4K content.
- Rec. 2020 is used for HDR content.
- Range: Full range utilises the entire 0-255 colour values, providing more detail in highlights and shadows.
13. Audio
- Format: AAC is the preferred audio codec for YouTube, offering good quality at lower bitrates.
- Sample Rate: 48000 Hz is the standard for video production
- Channels: Stereo provides a good balance between quality and compatibility.
- Quality: High setting ensures clear, crisp audio.
Saving Presets for Future Use
You now have set the best export settings for your YouTube videos. Let’s save these settings as a preset. This will make it easier for you in future projects.
In the “Export Settings” dialog box, find the “Preset” dropdown menu. Click on it and choose “Save Preset.” Give your preset a clear name, like “YouTube 1080p” or “YouTube 4K,” and click “OK.”
Saving presets is a great way to save time. It also keeps your export settings consistent across different projects.
Optimizing for YouTube: Specific Considerations
Now that the Premiere Pro export settings for YouTube we talked about are setup. Let’s look at more details to improve your videos on the site.
When you upload a video, YouTube changes the file, and this can sometimes make the picture a bit worse.
Knowing this, you can adjust your export settings to match YouTube’s compression standards, including specific considerations for platforms like Instagram. This will help you keep as much quality as possible on your timeline.
Understanding YouTube’s Compression
YouTube’s compression tools help keep a good balance between video quality, storage, and streaming needs for many users. When you upload a video, YouTube changes it to make different versions that fit various devices and internet speeds.
Even though YouTube works hard to keep the best quality, some loss in quality happens during this change. That’s why picking the right export settings in Premiere Pro for YouTube is very important.
By setting the right bitrate and resolution, you give YouTube a high-quality file to use. This helps reduce any loss in visual quality when it is compressed.
Recommended Bitrates and Resolutions
Selecting the right bit rate and resolution ensures smooth playback and optimal visual quality for your viewers.
YouTube recommends specific target bitrates based on your video’s resolution. Here is a general guideline:
Resolution | Frame Rate (fps) | Target Bitrate (Mbps) |
1080p | 24, 25, 30 | 8-12 |
1080p | 50, 60 | 12-16 |
1440p | 24, 25, 30 | 16-20 |
1440p | 50, 60 | 20-30 |
2160p (4K) | 24, 25, 30 | 32-48 |
2160p (4K) | 50, 60 | 48-68 |

Social Media Aspect Ratios and Resolution
Here’s the list of optimal aspect ratios for different social media platforms, including the highest resolution available for each, without using the word “max”:
1. YouTube
- Landscape: 16:9 (up to 3840×2160 – 4K)
- Shorts: 9:16 (up to 2160×3840)
2. Instagram
- Posts: 4:5 (portrait, up to 1080×1350)
- Stories and Reels: 9:16 (up to 1080×1920)
- IGTV: 9:16 (up to 1080×1920)
3. Facebook
Feed posts:
- 1:1 (up to 1080×1080)
- 4:5 (up to 1080×1350)
- 16:9 (up to 1920×1080)
- Stories: 9:16 (up to 1080×1920)
- Cover photo: 16:9 (up to 851×315)
4. Twitter
Feed posts:
- 16:9 (up to 1920×1080)
- 1:1 (up to 1200×1200)
Twitter Card image:
- 1.91:1 (up to 1200×628)
5. LinkedIn
Feed posts:
- 1:1 (up to 1200×1200)
- 4:5 (up to 1080×1350)
- 16:9 (up to 1920×1080)
Cover photo:
- 16:9 (up to 1584×396)
6. TikTok
9:16 (up to 1080×1920)
7. Pinterest
Pins:
- 2:3 (up to 1000×1500)
- 1:1 (up to 1000×1000)
8. Snapchat
- 9:16 (up to 1080×1920)
9. Twitch
- 16:9 (up to 1920×1080)
10. WhatsApp
- 9:16 (up to 1080×1920)
11. Reddit
- 16:9 (up to 1920×1080)
- 4:3 (up to 1600×1200)
- 1:1 (up to 1200×1200)
12. Vimeo
16:9 (up to 7680×4320 – 8K)
Remember that while these are the highest resolutions available, not all users or devices may be able to view content at these resolutions. Platforms may compress or resize images and videos for optimal delivery.
It’s always best to check each platform’s current guidelines for the most up-to-date information.
Using Adobe Media Encoder to Export
Adobe Media Encoder is a powerful tool that allows users to offload rendering tasks from Premiere, enabling continued work while exports process.
The queue system facilitates batch processing of multiple exports with different settings, saving time for creators who need various output formats.
With platform-specific presets and seamless integration with other Adobe tools, Media Encoder is free to use and streamlines the export process.
Conclusion
Optimising your Premiere Pro export settings for YouTube is crucial for ensuring your videos look their best on the platform. Adding captivating text in Premiere Pro can massively increase engagement.
By following the recommended settings we’ve outlined – including using the H.264 codec, a bitrate of 16-20 Mbps for 1080p content, and the 35-45 for 4K then you’ll achieve an ideal balance of quality and file size.
With these export settings dialled in, you can be confident that your content will shine on YouTube, engaging viewers with crisp, professional-looking videos.
Frequently Asked Questions
What is the Best Video Format for YouTube Uploads?
The best Premiere Pro export settings for YouTube format is MP4 with the H.264 codec. This format gives a good mix of quality and file size. It allows for HD or UHD resolution videos that work well on many devices.
How Do I Create a Speed Ramp in Premiere Pro?
To create a speed ramp in Premiere Pro, start by selecting your clip and enabling Time Remapping in the Effect Controls panel.
Then, add keyframes at the points where you want the speed to change, and adjust the speed graph between these keyframes to create smooth transitions from normal speed to fast or slow motion.
How do I Ensure my Video Doesn’t Lose Quality After Uploading?
To keep your video quality high, upload videos using YouTube’s suggested bitrates for the resolution you choose. A higher bitrate keeps more video information.
YouTube suggests a target bitrate of 16-20 Mbps for 1080p content, and the 35-48 for 4K.
What Software is Best for Editing Video on Mobile?
For editing videos on mobile devices, apps like LightCut are recommended by DJI which supports 4K editing, Premiere Rush comes with a subscription of Premiere Pro and is available to use on mobile for video editing.
These easy-to-use apps provide many features. You can create interesting content for social media platforms.
