As a drone videographer with over 5 years of experience editing in Premiere Pro for my YouTube channel, I’ve come to appreciate the power of speed ramping.
This technique can transform ordinary footage into dynamic, eye-catching sequences that captivate viewers. In this article, I’ll share my insights on creating satisfying speed ramps in Premiere Pro, from basic functions to more complicated speed ramps.

Premiere Pro Free Trial
You can download Premiere Pro here which comes with a free trial.
Understanding Speed Ramps
Before we dive into the specifics, let’s clarify what a speed ramp is. In simple terms, it’s a gradual change in the speed of a video clip, either speeding up or slowing down. This technique can add drama, emphasise key moments, or create a stylistic flow in your video project.
Why Use Speed Ramps in Drone Footage?
Drone footage often benefits from speed ramping. In my experience, it can:
- Emphasize the scale and grandeur of landscapes
- Create a sense of acceleration or deceleration in flyover shots
- Highlight specific moments in a sweeping aerial view
Premiere Pro is a powerhouse for editing drone videos and adding special effects. We will dive more into what it can do later on.
Preparing for Your First Speed Ramp
Before starting with speed ramping in Premiere Pro, make sure you have everything ready for easy editing. Just like a painter prepares their canvas, doing a few simple things first will help you succeed and enjoy this fun technique.
Having the right tools and knowing the basics of the Premiere Pro interface will make your speed ramping experience smooth and easy.
Essential Tools and Resources for Speed Ramping
The idea of speed ramping may sound difficult, but the tools you need are easy to find in Premiere Pro. Knowing a few important parts will help you feel ready to try it out. Here’s what you will need:
- Adobe Premiere Pro: You will need access to Premiere Pro, which is one of the top video editing software programs.
- Selection Tool (V): This handy tool helps you select, move, and change clips and keyframes on the timeline.
- Razor Blade Tool (C): When you want to create smooth speed ramps, precision is important. The Razor Blade tool allows you to make exact cuts in your video clips and focus on the parts you want to change.
- Keyframe Markers: Keyframes act like signposts on your timeline. You will use them to mark the spots where you want to speed up, slow down, or change the speed of your footage.
Creating a Basic Speed Ramp in Premiere Pro
Let’s start with the simple steps to create a basic speed ramp.
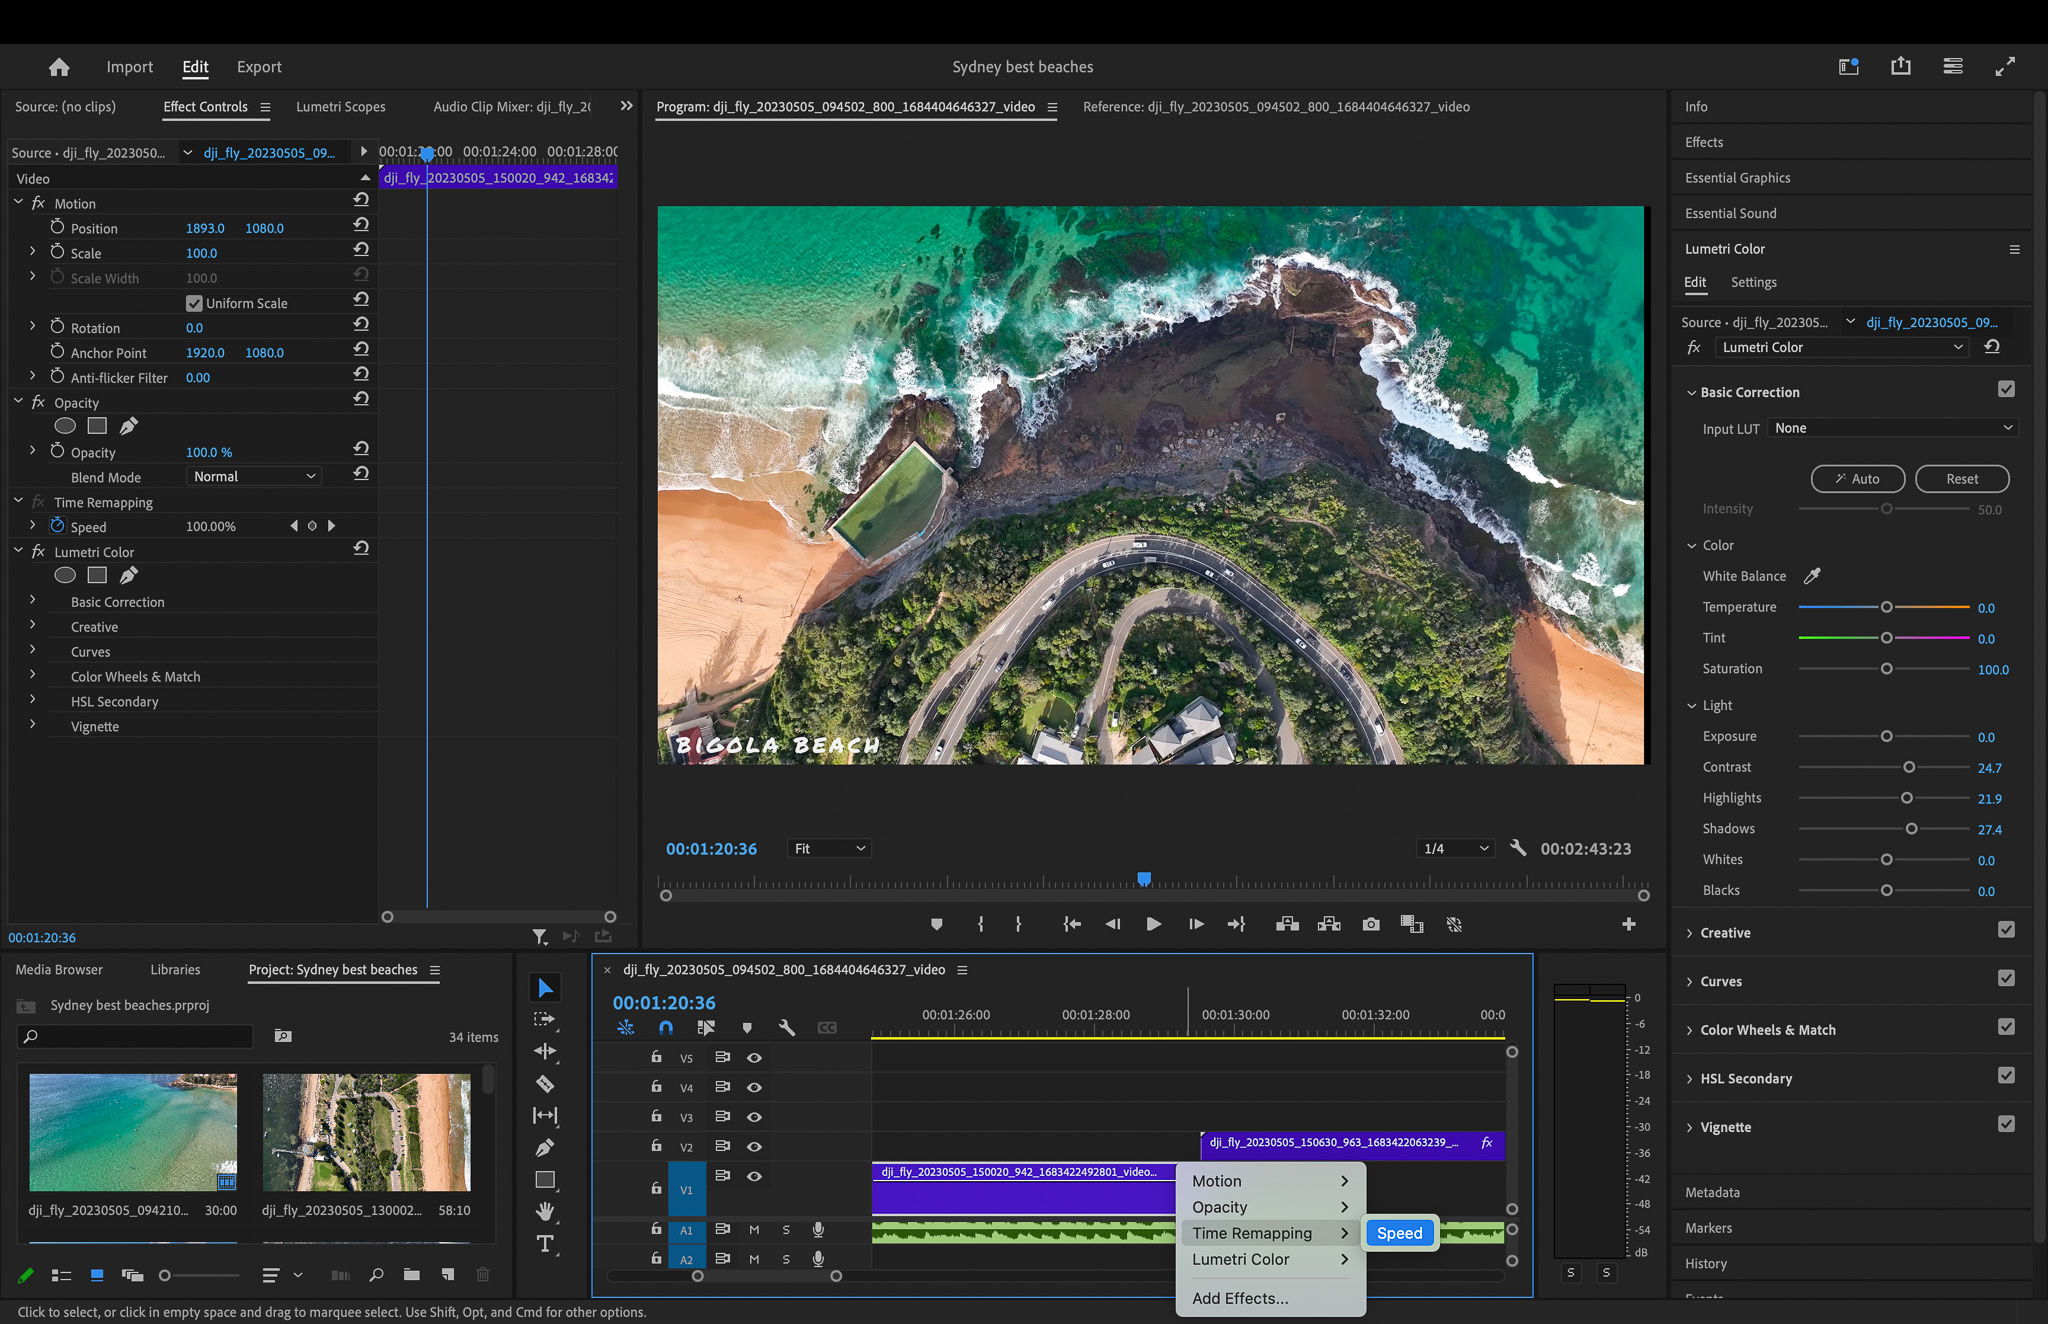
- Select your clip in the timeline.
- Right-click and choose “Speed/Duration” (or use the keyboard shortcut Ctrl+R on Windows, Cmd+R on Mac).
- In the Speed/Duration panel, check “Retime Speed” and adjust the speed percentage.
- Ensure you have enough handles (extra footage) at the start and end of your clip for ramping.
- Adjust the speed percentage. Values below 100% slow the clip down, above 100% speed it up.
- For a basic ramp, you might set it to 50% for a slow-motion effect or 300-500% for a sped-up look.
- I like to put the speed ramp in the middle of the clip and leave it normal speed(100%) at the start and finish.
This method works for uniform speed changes, but for a true ramp effect, we need to go further.
Using the Rate Stretch Tool
The Rate Stretch tool, found in the toolbar, is another basic function for adjusting clip speed. However, it doesn’t provide the smooth transition we’re looking for in a speed ramp. Thats where advanced speed ramping techniques come in.
Advanced Speed Ramping Techniques
For the best results and more control over your speed ramps, we’ll use keyframes.
- Select your clip and open the Effect Controls panel
- Expand the “Time Remapping” section
- Set keyframes at the points where you want the speed to change
- Adjust the speed graph between keyframes to create smooth transitions
- Dragging up increases speed, down decreases it.
- Play around with different speeds anywhere from 200-1000% speed ramp
Fine-Tuning Your Speed Ramp
To really perfect your speed ramp:
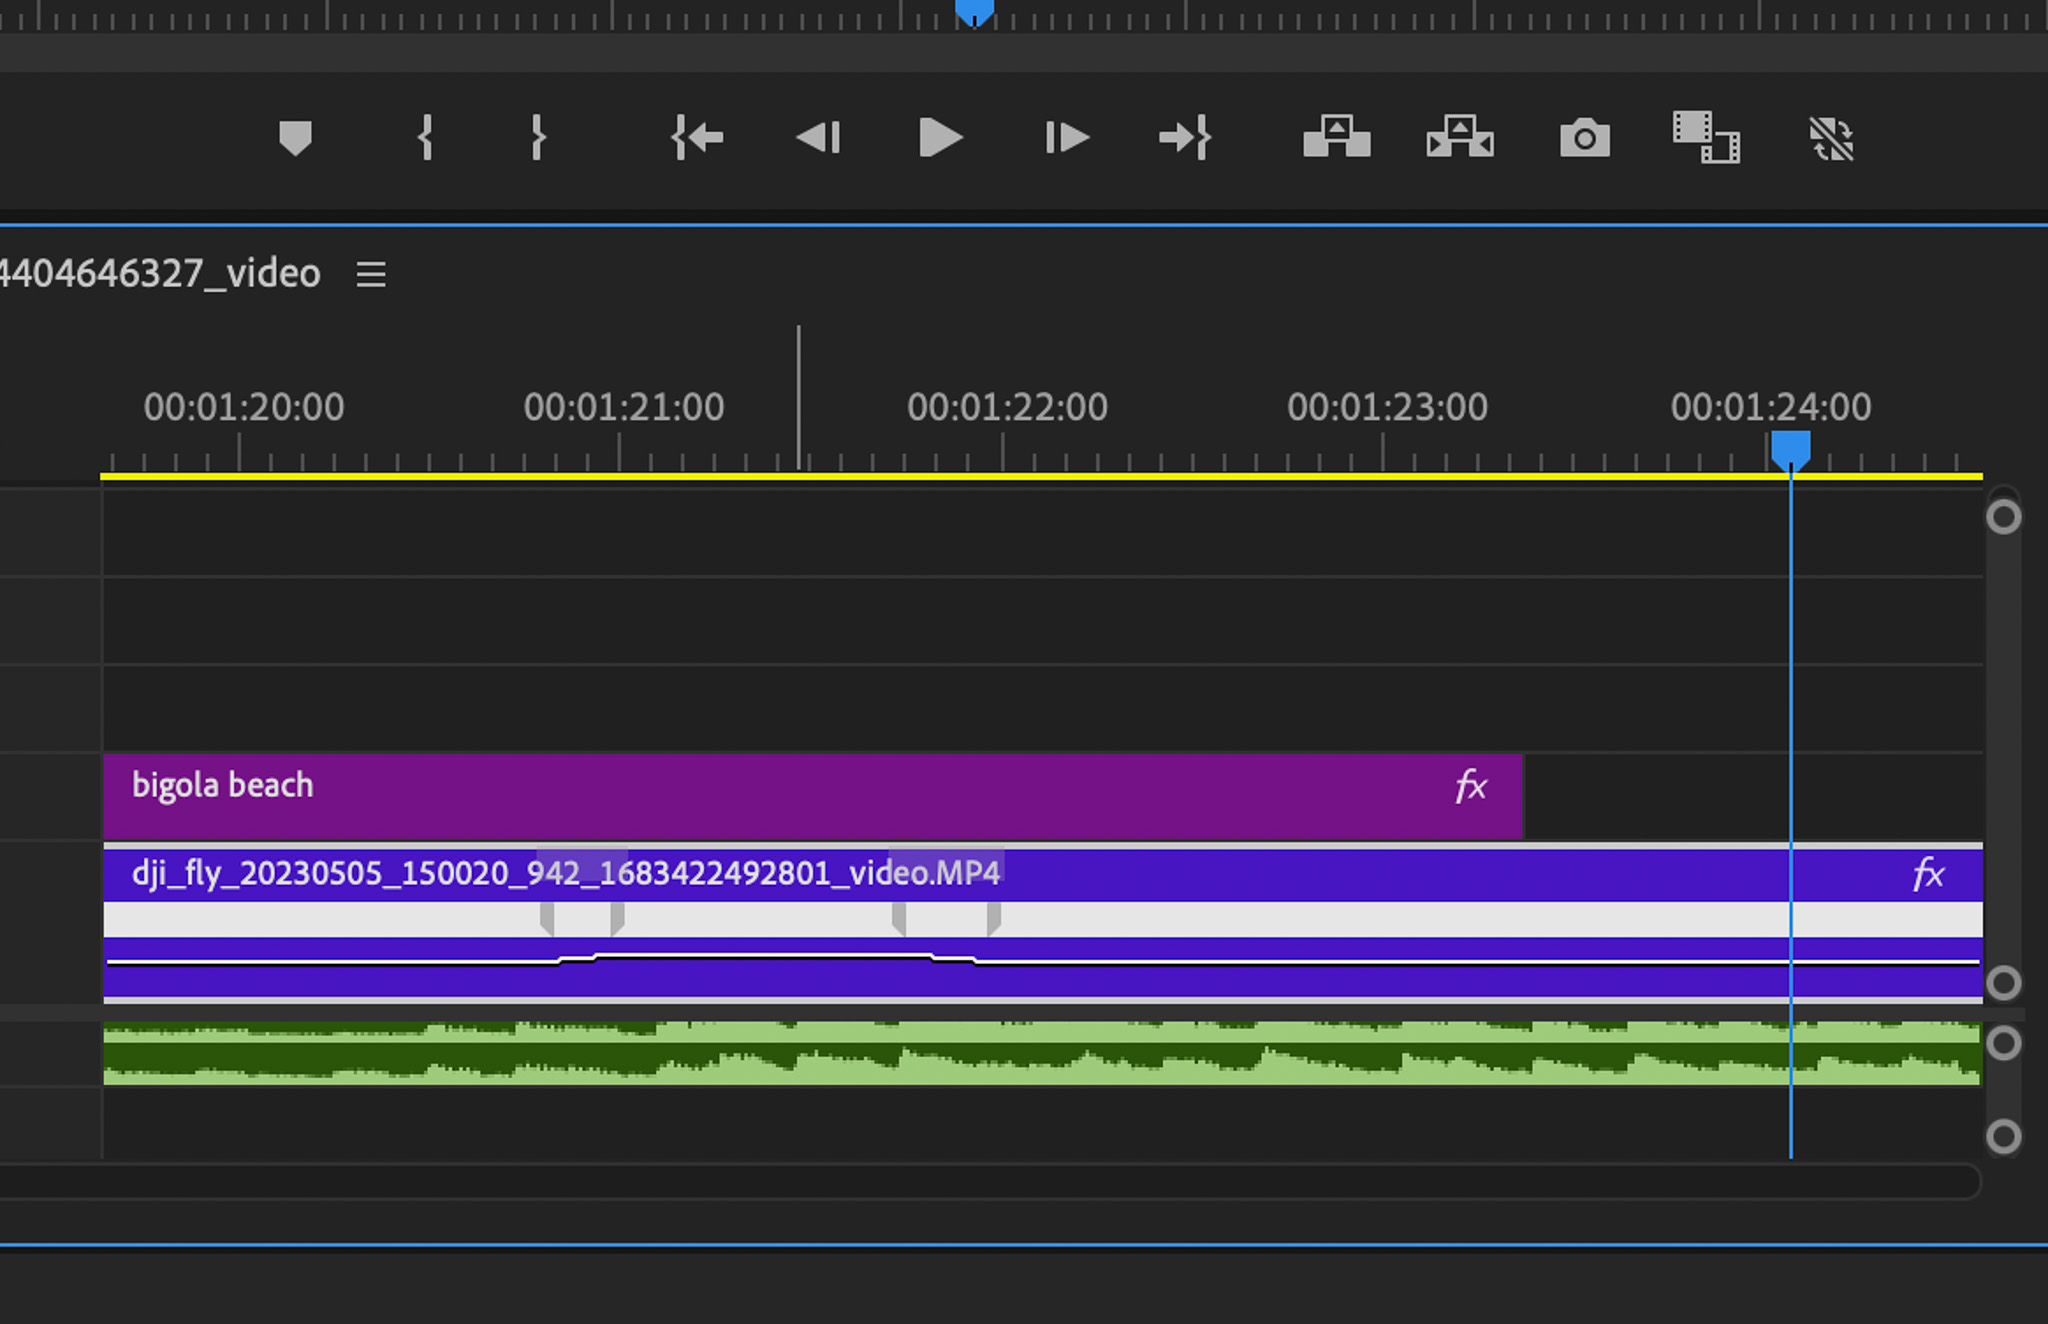
- Use Bezier handles on your keyframes for smoother transitions
- Experiment with different curve shapes in the speed graph
- Adjust the number of frames between keyframes for varying ramp durations
- Try S-curves for smooth ramps or sharp angles for sudden speed changes.
Enhancing Your Speed Ramp in Premiere Pro
Over the years, I’ve discovered some key features and tricks to elevate my speed ramps:
Frame Blending and Optical Flow
For smoother playback, especially in slow-motion sections:
- Right-click on your clip
- Go to “Time Interpolation”
- Choose “Optical Flow” for the best results (though it may increase render time)
Adding Motion Blur
To enhance the sense of speed:
- Apply the “Posterize Time” effect
- Set it to match your sequence frame rate (e.g., 24 fps)
- Add the “Directional Blur” effect and keyframe it to intensify during speed-up sections
Practical Applications in Drone Videography
In my drone videos, I often use speed ramps to:
- Transition between different scenes
- Emphasize the height gain in ascent shots
- Create dynamic reveals of landscapes or structures
Example: Epic Landscape Reveal
- Start with a slow-motion approach to a mountain range
- Gradually ramp up the speed as you crest the peak
- Return to normal speed for the reveal of the valley beyond
This creates a sense of anticipation and delivers a satisfying payoff for the viewer.
Advanced Tips for Complex Speed Ramps
For those looking to push their filmmaking further:
Nested Sequences
- Select the portion of your clip you want to ramp.
- Right-click and choose “Nest”.
- Apply speed ramps to the nested sequence.
- You can now apply additional effects or ramps to the main clip without affecting the nested ramp.
Use nested sequences to apply multiple speed ramps within a single clip without affecting the original footage.
Reverse Speed Ramps
Create a bounce effect by ramping speed up, then immediately ramping it down.
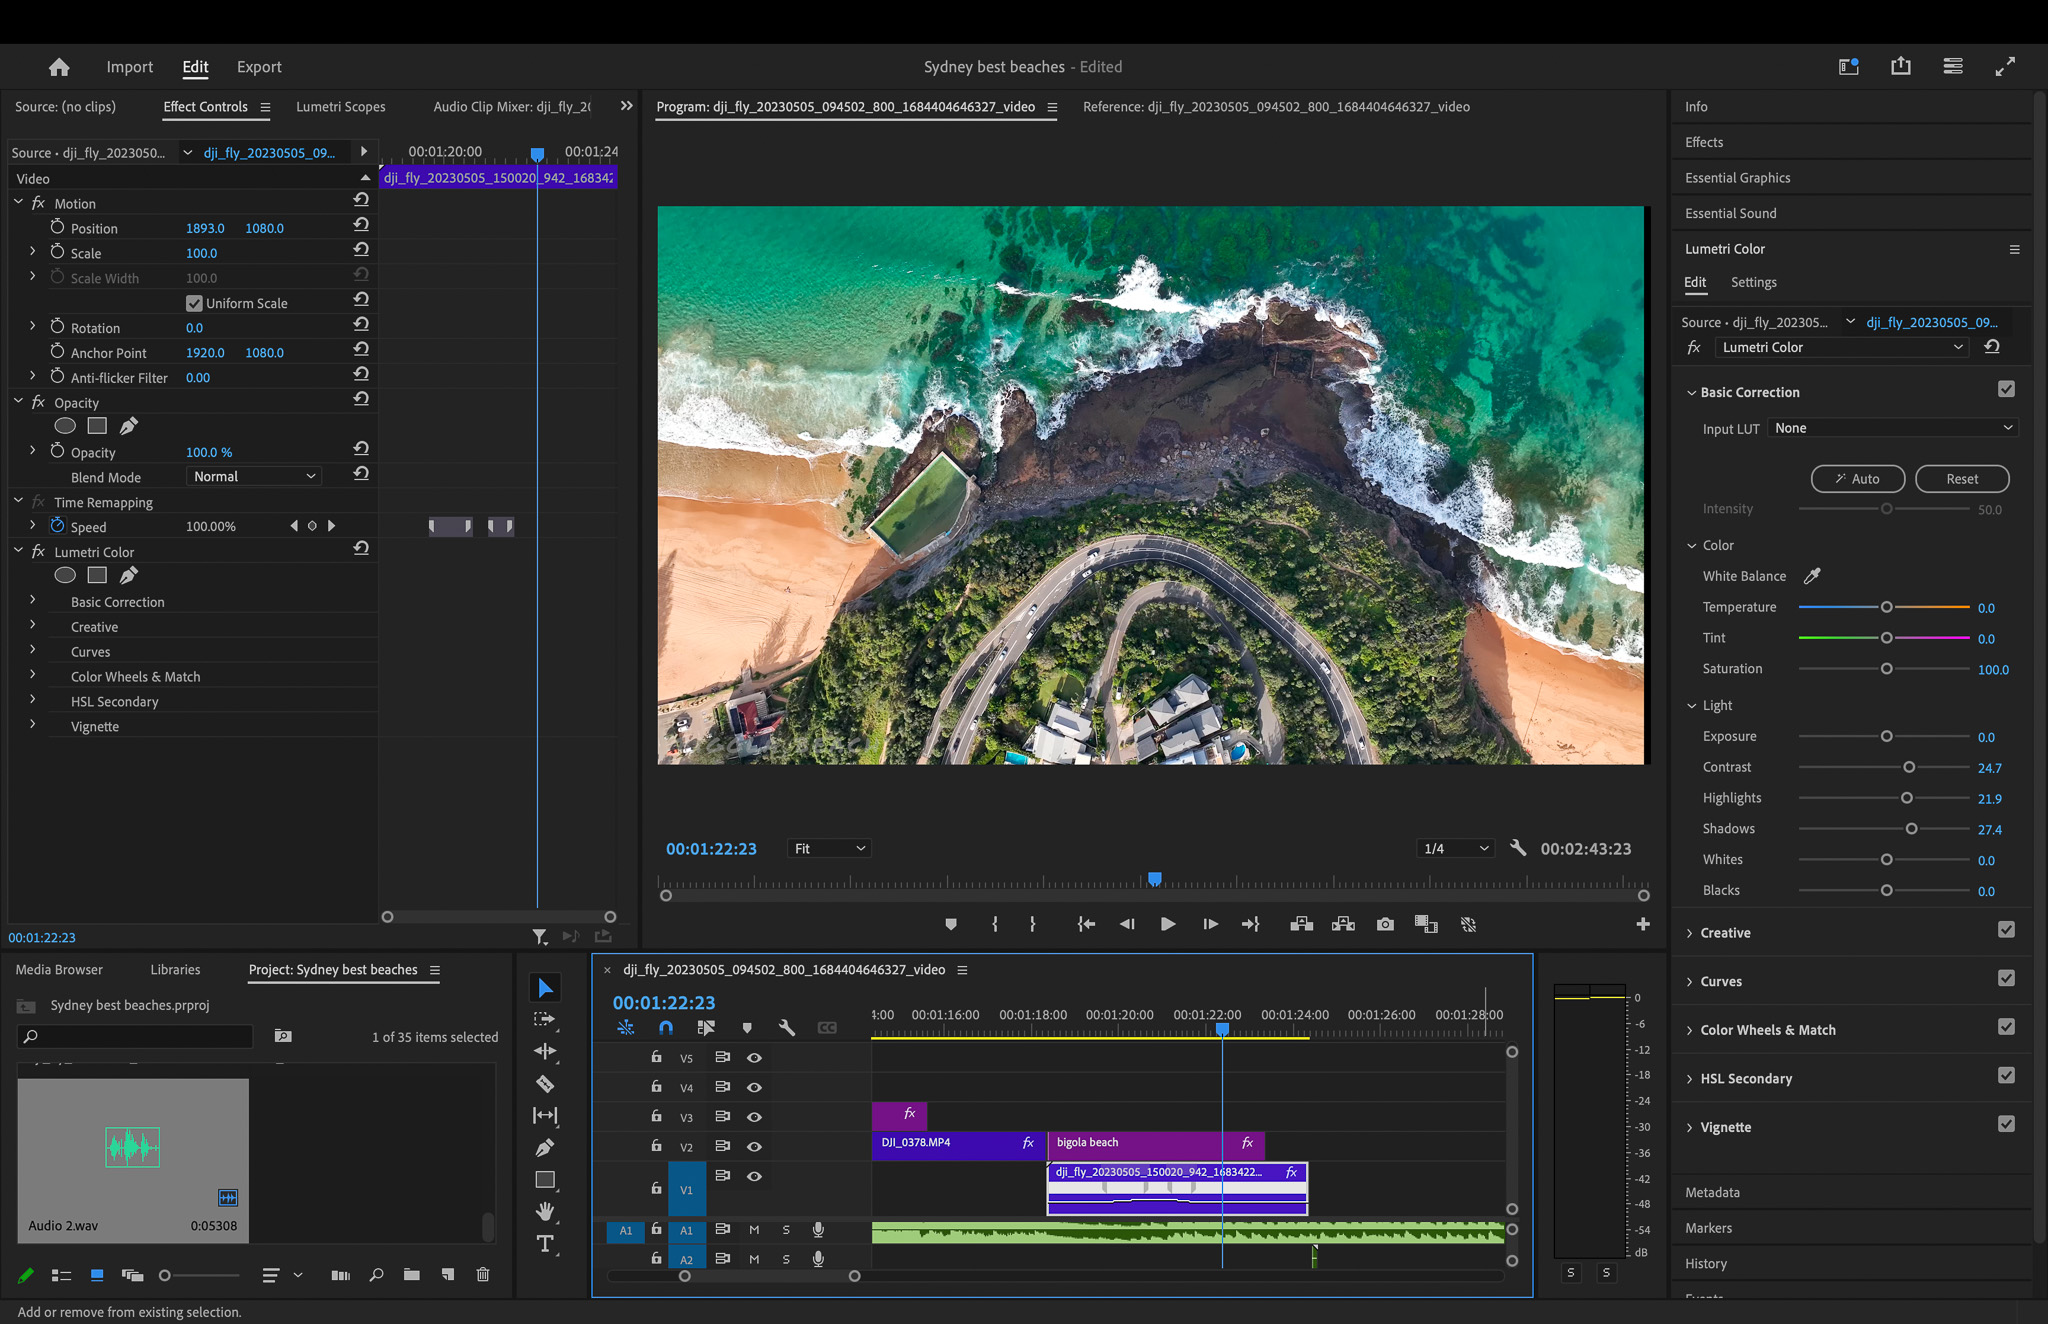
- Create a speed ramp as normal.
- Add additional keyframes to bring the speed back down immediately after ramping up.
- Adjust the graph to create a smooth “bounce” effect in speed.
Combining with Other Effects
Layer speed ramps with opacity changes or other effects for more complex and visually interesting transitions.
1. Opacity Changes
Fading your footage in or out while speed ramping can create smooth transitions or dreamy effects.
- Apply your speed ramp as described earlier.
- In the Effect Controls panel, expand the “Opacity” property.
- Add keyframes to gradually change opacity:
- For a fade-in, start at 0% and increase to 100%.
- For a fade-out, start at 100% and decrease to 0%.
- Align these opacity keyframes with your speed ramp keyframes for a synchronized effect.
Example use: Fade in slowly as your drone ascends, then rapidly increase both speed and opacity for a dramatic reveal.
2. Scale and Position
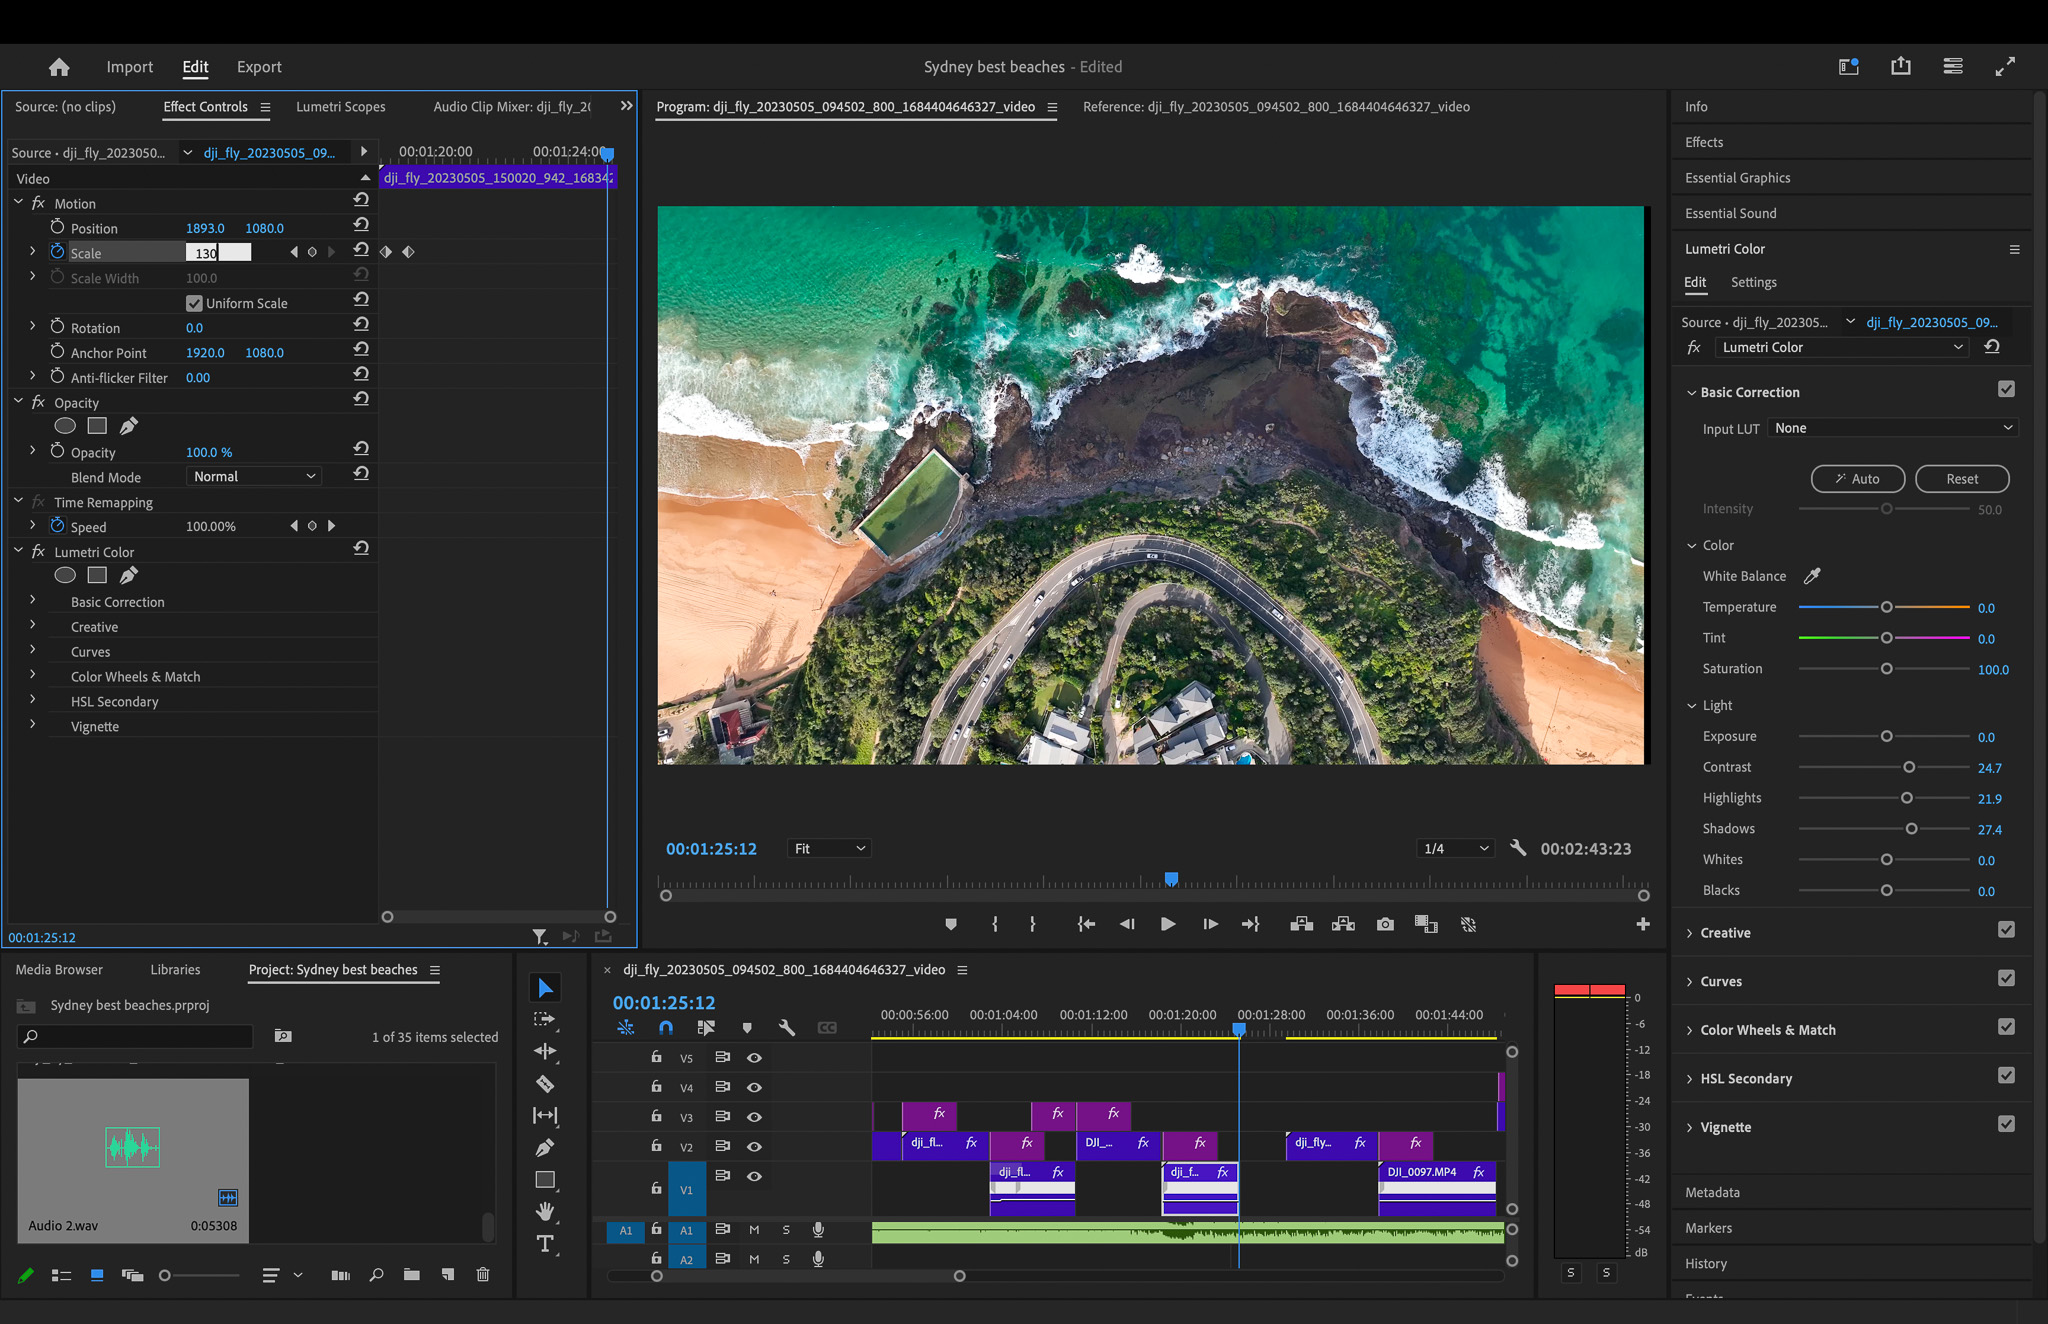
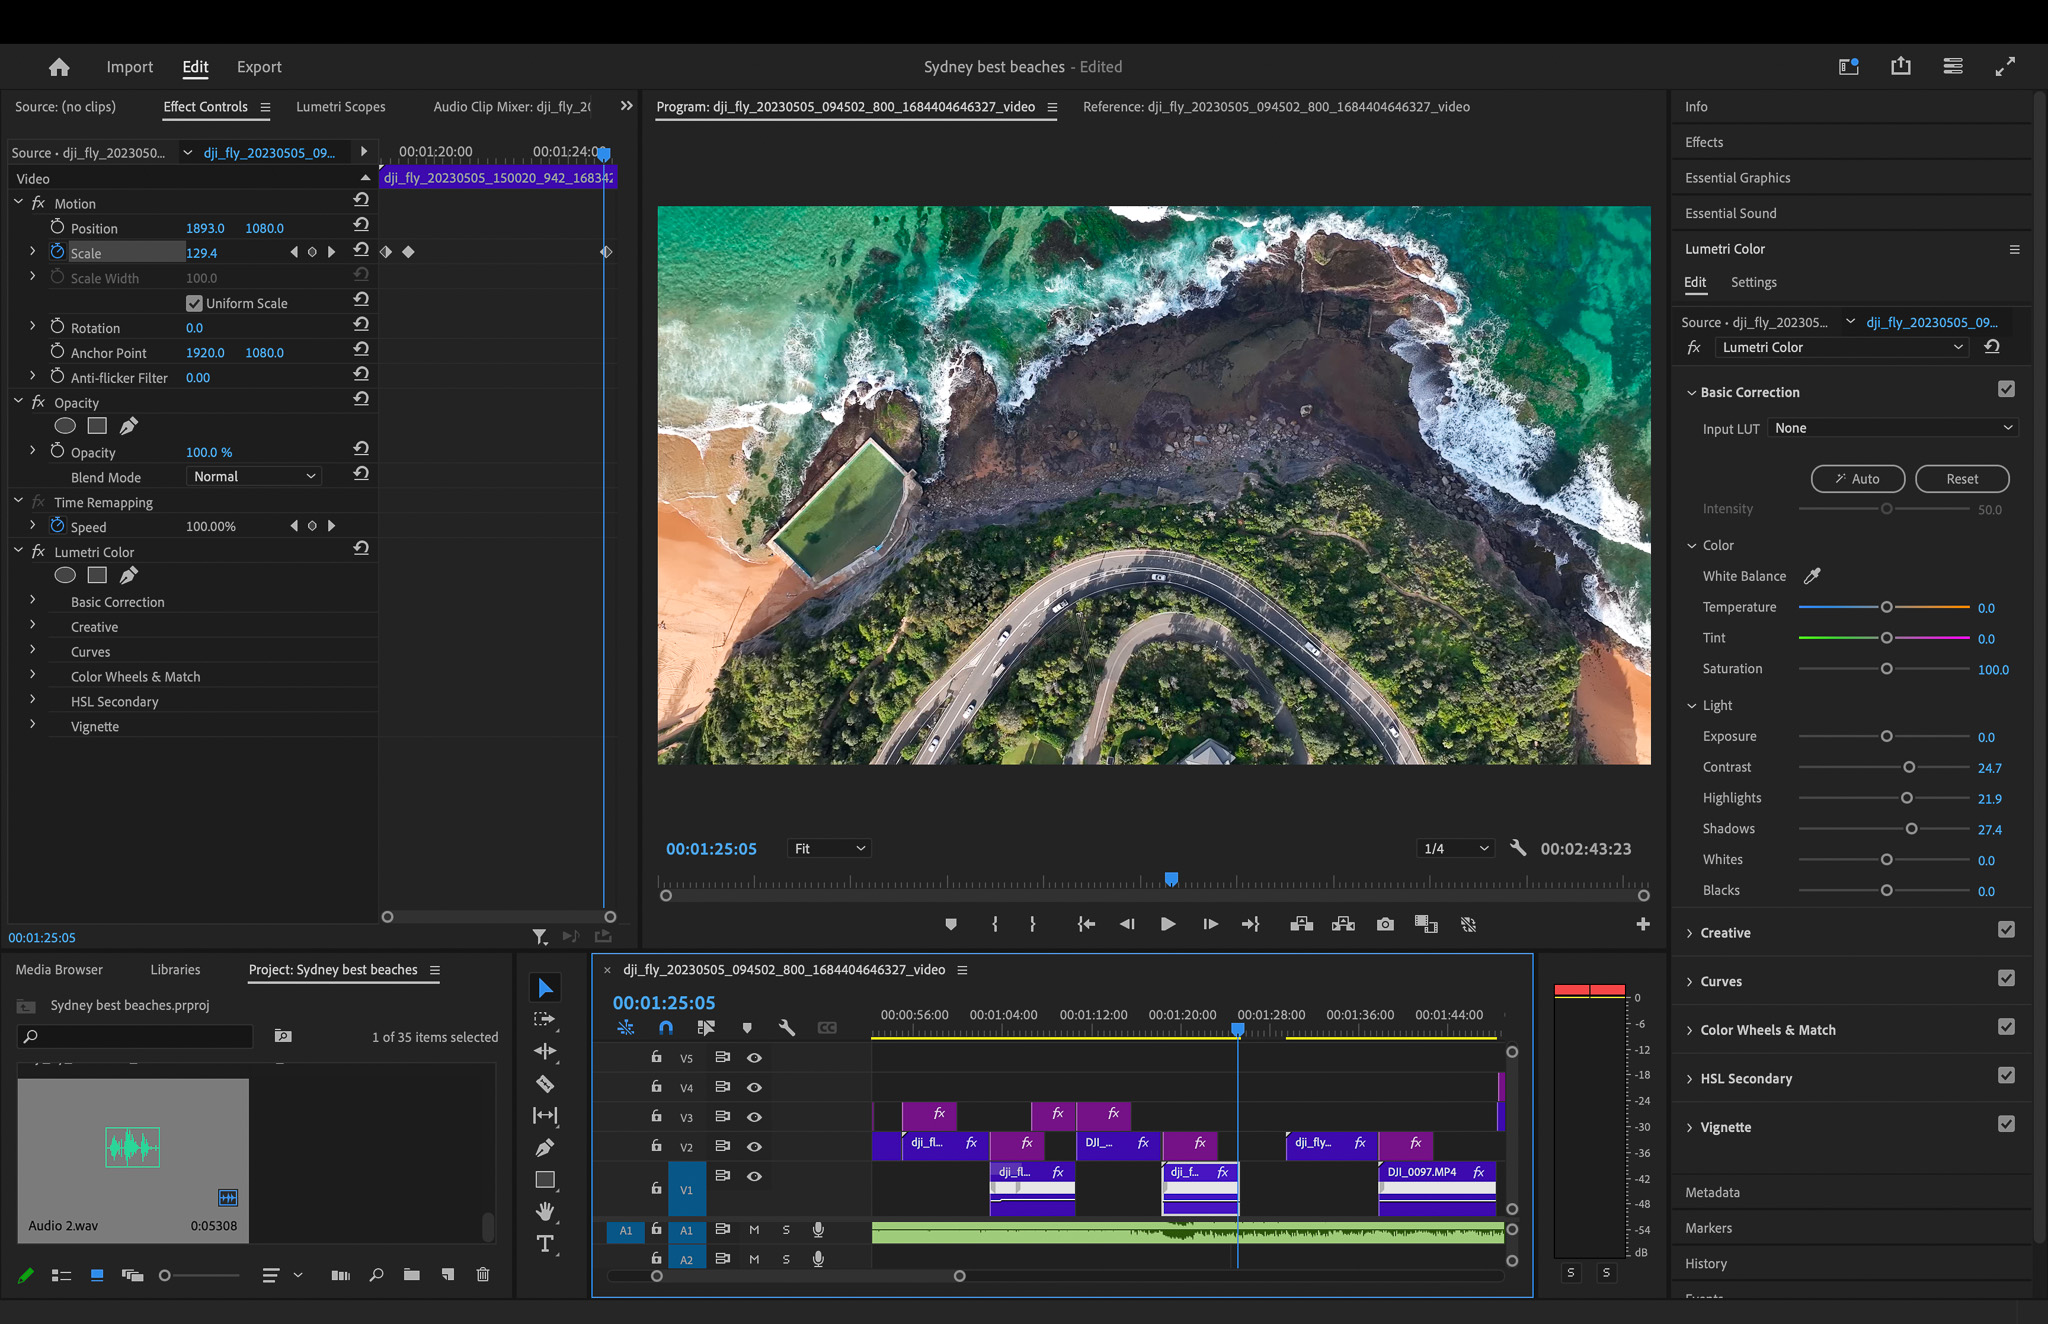
Combining speed ramps with zooms or pans can create a sense of acceleration or vertigo.
- In the Effect Controls panel, expand “Motion” properties.
- Add keyframes for “Scale” or “Position” (or both).
- Synchronize these with your speed ramp keyframes.
Example use: As your drone footage speeds up, gradually increase the scale to create a “zoom boost” effect.
Take note of the positions of the white dots in the timeline next to scale. Create 3 dots and increase the scale at the end of the clip to gradually zoom in.
3. Blur Effects
Adding blur during speed changes can enhance the sense of motion.
- Apply the “Gaussian Blur” effect to your clip.
- Keyframe the “Blurriness” value to increase during speed-ups and decrease during slow-motion.
Example use: Increase blur as your drone footage accelerates over a cityscape, then sharpen as it slows down to focus on a specific building.
Troubleshooting Common Issues
Here are some tips to fix some common problems you may have when editing your videos in Premiere Pro.
Audio Syncing
Speed ramping can throw off your audio sync. To fix this:
- Unlink your audio from the video
- Adjust the audio independently or use the “Rate Stretch” tool to match the video speed
Frame Rate Mismatches
When working with footage shot at different frame rates:
- Create separate sequences for each frame rate
- Apply speed ramps within these sequences
- Nest these sequences in your main project sequence
Conclusion
Adding a speed ramp in Premiere Pro has been a game-changer for my drone videography. It’s allowed me to create more dynamic and engaging content for my YouTube channel, elevating the viewing experience for my audience.
Remember, while these techniques can produce epic results, they should be used sparingly. A little bit goes a long way – overuse can spoil your video rather than improve it.
Whether you’re working on a specific topic video or a broader landscape showcase, incorporating speed ramps can add that professional touch to your final cut. Keep practicing, and soon you’ll be creating complicated speed ramps that will wow your viewers.
Frequently Asked Questions
How Can I Smooth the Transition in a Speed Ramp?
In Premiere Pro, you can make your speed transitions smoother. You just need to add more keyframes to your speed ramp. Spacing these keyframes out will help change the speed gradually. This leads to a smoother and more natural look.
Can I apply Speed Ramps to 4K Video in Premiere Pro?
Yes, you can definitely apply speed ramps to 4K video in Premiere Pro. The software can handle high-resolution footage easily. You can change the speed of your 4K videos just like you would with other resolutions.
Are there any Shortcuts for Speed Ramping in Premiere Pro?
Using shortcuts in Premiere Pro can save a lot of time. Use the “J” and “K” keys can help you move quickly through your timeline. Also, pressing “Cmd/Ctrl + K” will let you cut clips.
Although there is no quick way to turn on speed ramping, these tips will make your editing time better.
How do I Reverse a Speed Ramp Effect?
To reverse a speed ramp in Premiere Pro, first, select the part of the video clip with the effect. Next, right-click and pick “Speed/Duration.” After that, in the dialog box, check the “Reverse Speed” option.
