You’ve taken some amazing drone footage of a beautiful beach at sunset, now what? Now it’s time to bring the footage to life with drone editing software.
All the editing software mentioned in this article has incorporated AI-powered tools which allow you to be a pro editor within seconds, doing things like removing subjects from the background, removing unwanted sounds from audio and automatically creating subtitles.
In this article, we will explore the best drone editing software for 2025, taking into consideration factors such as ease of use, advanced features, compatibility, and affordability. So let’s dive in!
Top 5 Drone Editing Software Picks for 2025
Now let’s explore the top 5 drone editing software picks for 2025. These software options have been carefully chosen based on their popularity, user reviews, and advanced features.
Best Drone Editing Software 2025
1. LightCut – Free mobile app, great for editing drone videos quickly
2. Adobe Lightroom – Professional picture editing software
3. Adobe Premiere Pro – Advanced video editing software for drone footage
4. Final Cut Pro – Great drone video editing software for Mac users
5. DaVinci Resolve – Amazing colour grading editor for drone footage.
Each of these software options offers unique features and benefits, catering to different editing needs and skill levels. Whether you’re a beginner or an experienced editor, there’s a perfect software option for you.
1. LightCut
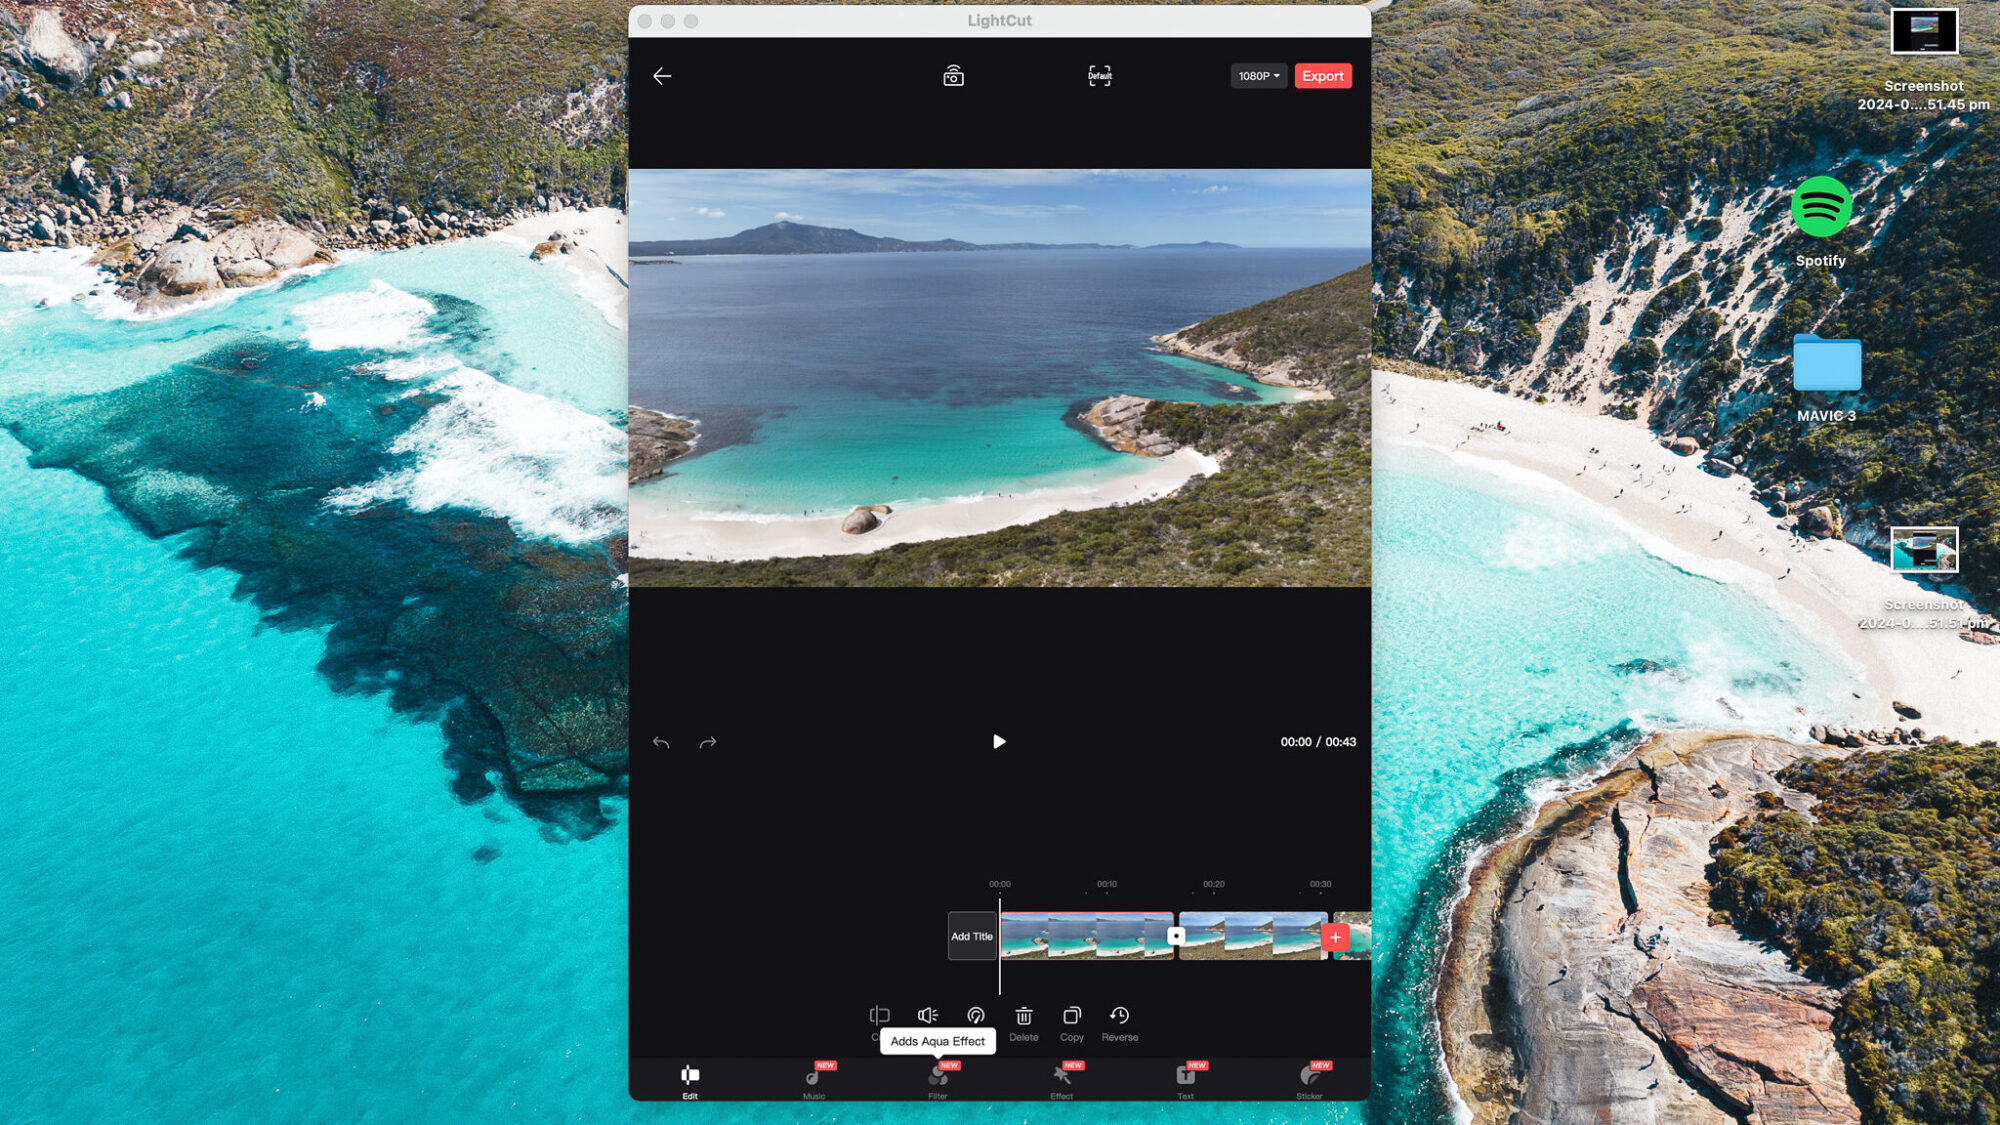
One of the best video editors for drone footage. Lightcut supports 4K video format from DJI drones as well as the Osmos mobile series. Built for smartphones although can used on Macs but with a 16:9 aspect ratio(see above).
- Easy to use templates for styles like travels, nature and vlogs
- 4K DJI video editing software for free
- Add the cool effect of snowing to your video
- One tap edit mode to quickly create a video
- Offers the usual editing features to edit colour, speed, cropping, add text plus more
- Integrates with the DJI app to effortlessly upload content
- Offers a unique video effects template called tilt shift.
It’s a really great mobile app that’s great to use if you want to quickly edit your drone footage on the move.
2. Adobe Lightroom
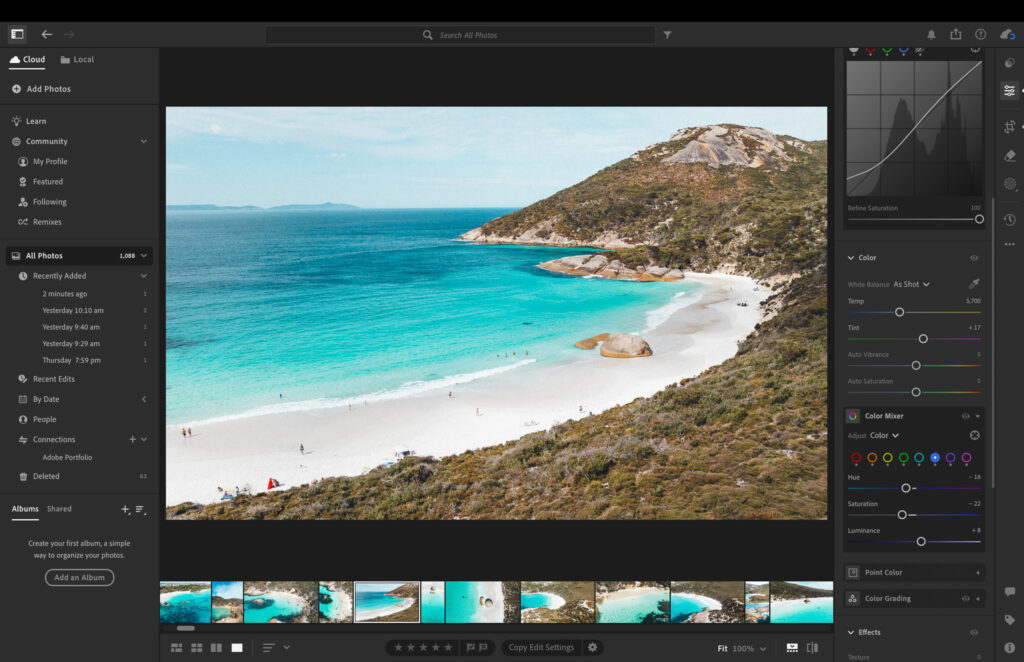
Since 2007 Adobe Lightroom Classic has been at the forefront of picture editing software. So they know a thing or two about how to create amazing images.
- The colour mixer tool allows you to enhance the individual colours in your drone footage, making them pop and look more vibrant. Turning the dark blue into a light blue can have a big boost in the look of your image
- Use presets to quickly edit your drone shots which also keeps a consistent look and feel for your brand
- Advanced editing tools such as lens correction, noise reduction
- AI cropping tools to swap out a subject
- Supports RAW images(optimum format for editing)
My go to software for editing drone images, saving me a ton of time with the presets and easy to use colour grading options.
3. Adobe Premiere Pro
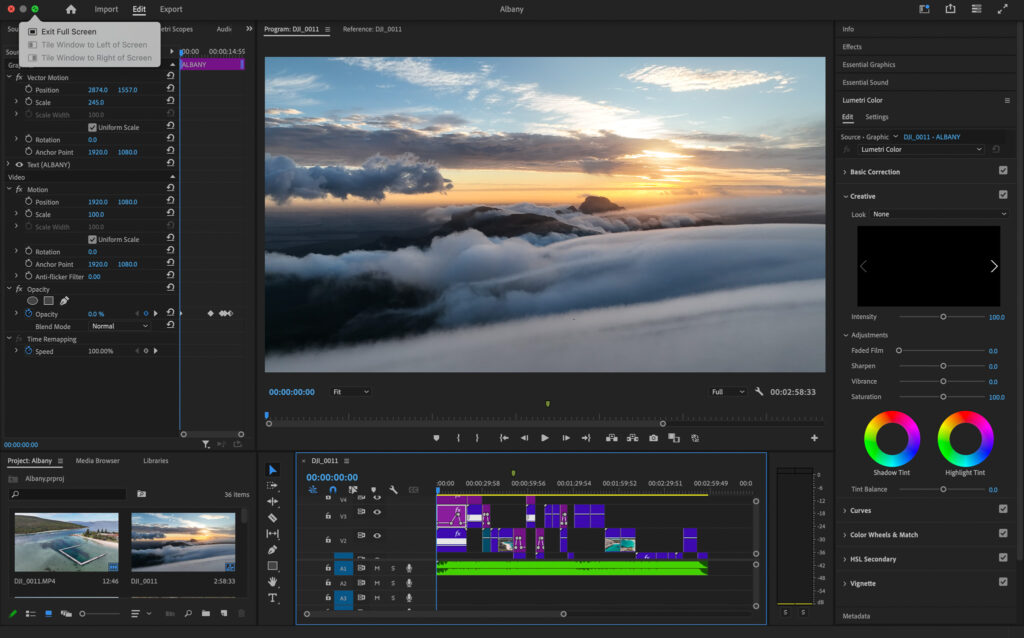
For those looking for a professional video editor then Adobe Premiere Pro has been on the leading edge for many years. Here’s what sets Adobe Premiere Pro apart:
- Advanced colour correction grading tools like lumetri scopes, colour wheels and curve tones
- Hundreds of professionally designed effects
- Compatible with a wide range of media formats
- Design quality titles, captions and text templates
- Enhance the audio by adding effects, adjusting levels, and eliminating background noise
- Fix shaky video with warp stabilizer
- Integrates with other Adobe software
- Uses Adobe Media Encoder to export video in the background whilst still working
Whether you’re a professional videographer or a passionate drone enthusiast, Adobe Premiere Pro provides the tools and capabilities to bring your drone footage to life.
4. Final Cut Pro
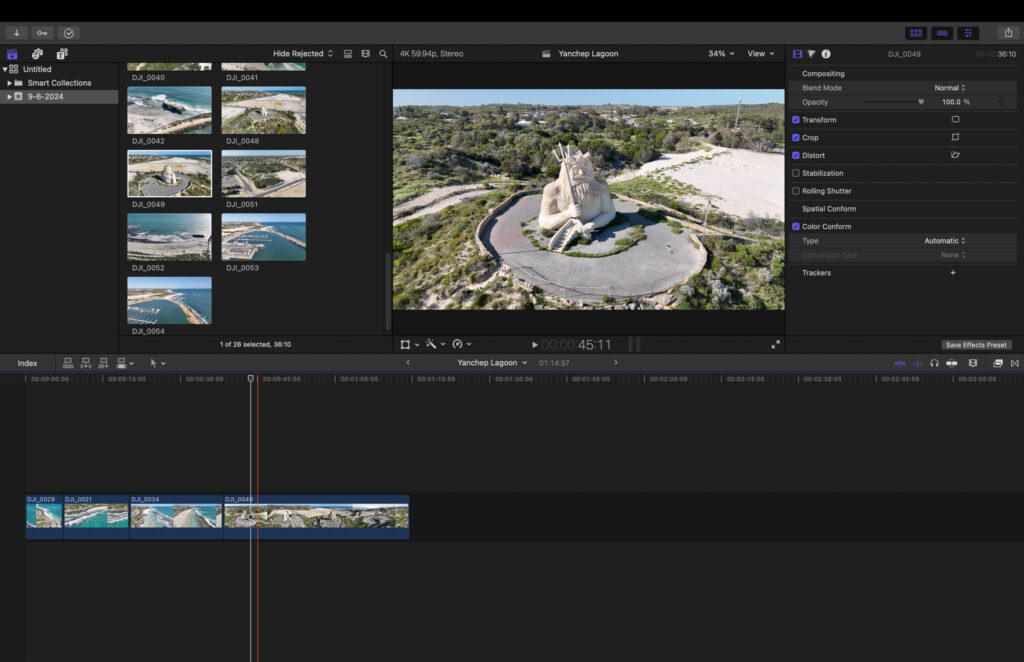
If you’re a Mac user, Final Cut Pro is the go-to software for editing your drone footage. Known for its seamless integration with Apple’s ecosystem, Final Cut Pro offers a range of powerful features specifically designed for Mac users.
Here’s why Final Cut Pro is a top choice for Mac users:
- View up to 16 angles at once with multicam
- Professional colour grading tools like colour wheels and colour curves
- Utilises 1600 nits of brightness to enhance contrast and vivid colours on Macs
- Integrates with third party apps like Shutterstock to download music and video
- Use templates to change colour, fonts, and animation styles
- Built-in features for exporting videos in the optimal formats for various social media platforms
Final Cut Pro works great on the Mac, maximising efficiency and producing crystal clear video on the high nit screen!
5. DaVinci Resolve
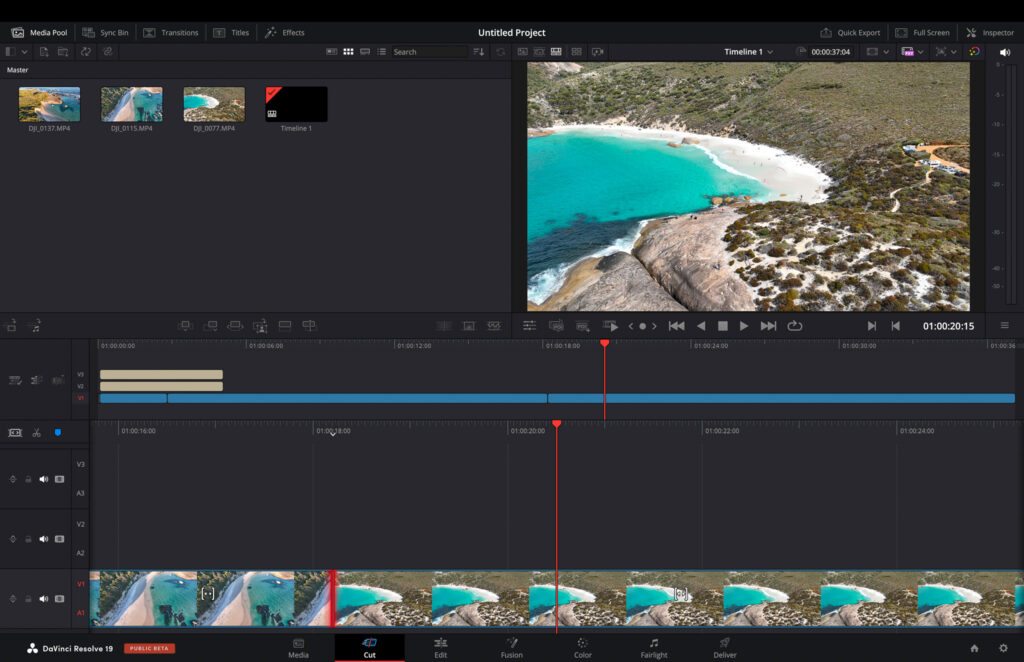
Renowned for its powerful colour grading capabilities, Davinci Resolve makes it an excellent choice for enhancing the visual appeal of your drone footage.
Here’s what makes DaVinci Resolve stand out:
- New AI tools now feature timeline editing based on text, music remixing, dialogue separation, and UltraNR noise reduction
- Automatically create subtitles
- Advanced features such as facial recognition, motion tracking, and multi-user collaboration
- AI based voice isolation lets you remove loud, unwanted sounds from voice recordings
- Professional tools for editing, audio post-production, and visual effects
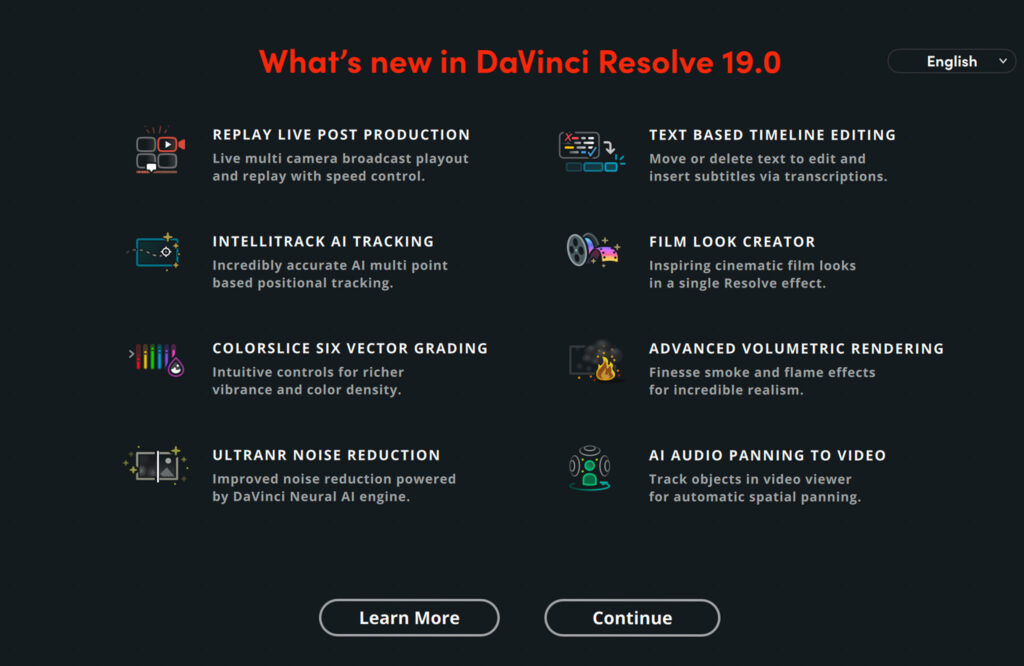
Whether you’re a professional colourist or a beginner looking to enhance your drone footage, DaVinci Resolve offers the tools and features to create visually stunning videos.
How to Use Drone Editing Software
In this short guide, we will give you some quick tips and tricks on how to use each of these drone editing software. We will cover all the essential steps.
1. How to Use LightCut
Getting started with LightCut is easy, even for beginners. Here’s a step-by-step guide to help you get started:
- Import by clicking on the new project button and selecting the drone video files from your computer
- Next, you will want to trim using the cut button over parts you don’t want then delete
- Reorder your videos by holding down on the video and sliding left or right
- Click on the filter menu at the bottom and then on adjust to edit the colour settings
- Head to the text panel then add text, choose your font and edit to your taste
- Next, add audio tracks in the music library panel
- Now crop your footage in the edit panel in the square box at the top named default
- Choose your required resolution(Instagram, TikTok and YouTube shorts use 1080p)
- Finally export using the top right red button
- You can return to your edited videos in the future on the home screen in the drafts
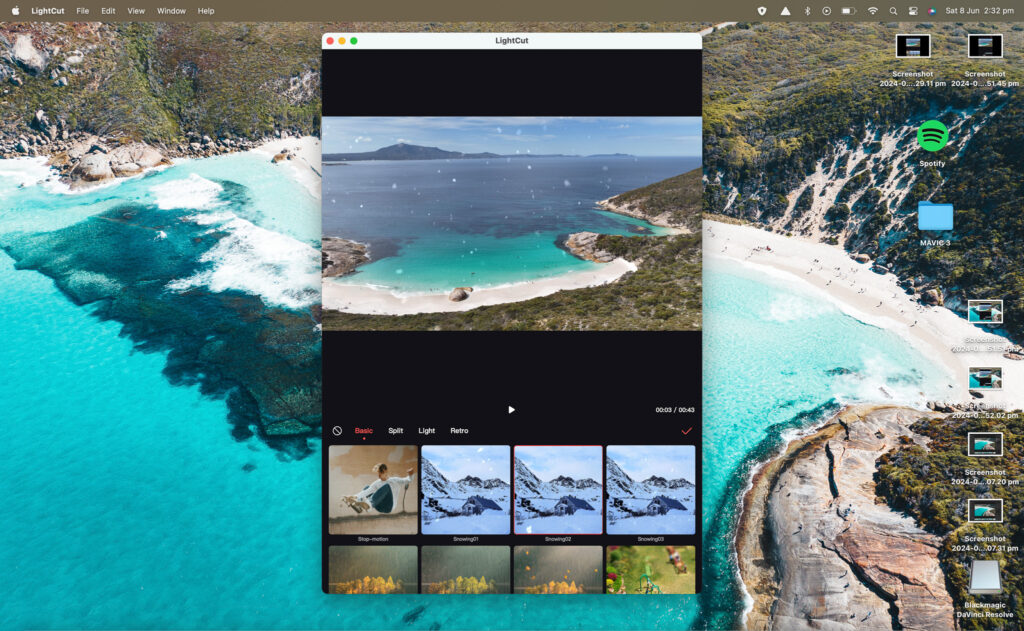
By following these steps, you’ll be well on your way to editing your drone videos like a pro using LightCut. It’s a fairly simple app that shouldn’t take long to pick up.
2. How to Use Adobe Lightroom
My go to drone editing software for photos is Lightroom. They have recently added a lot of AI tools which speed up the editing process and make complex tasks easy. Lightroom is available on mobile and PC.
- Import using the import button, Lightroom allows you to import multiple images
- Add a preset to your image
- Edit the brightness, contrast and shadows accordingly
- Head to the color panel then color mix to edit individual colours using the hue, saturation and luminance(I often change the blues in my beach shots to enhance the sea and the sky)
- Next, we’re going to remove anything we don’t want using the rubber tool sliding over the subject
- Finally, export using 100% image quality, alternatively lower image quality and use JPEG if you’d like a smaller file size
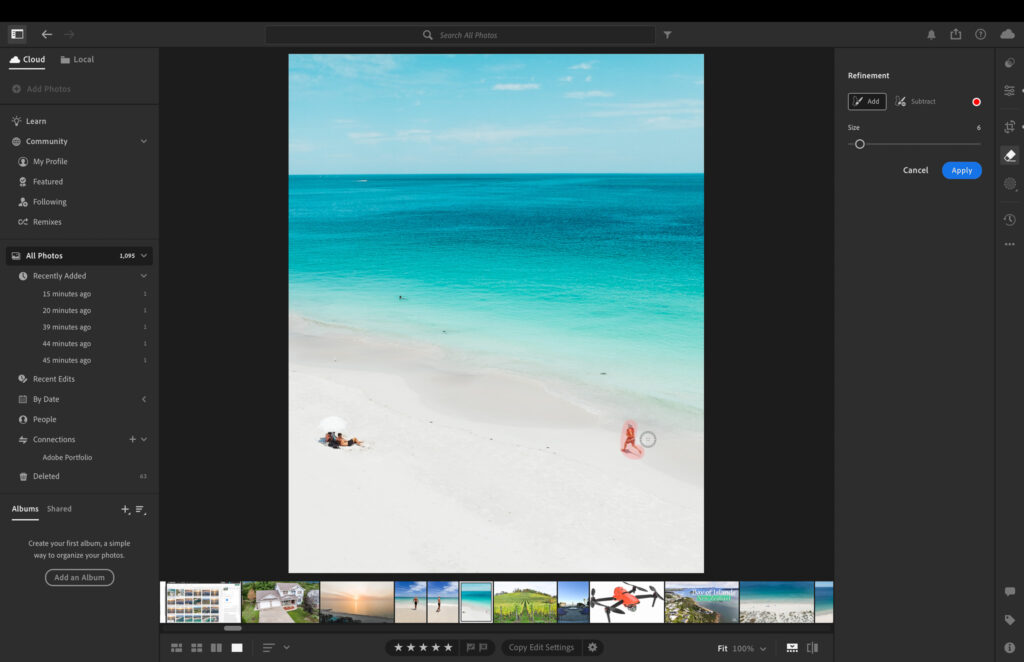
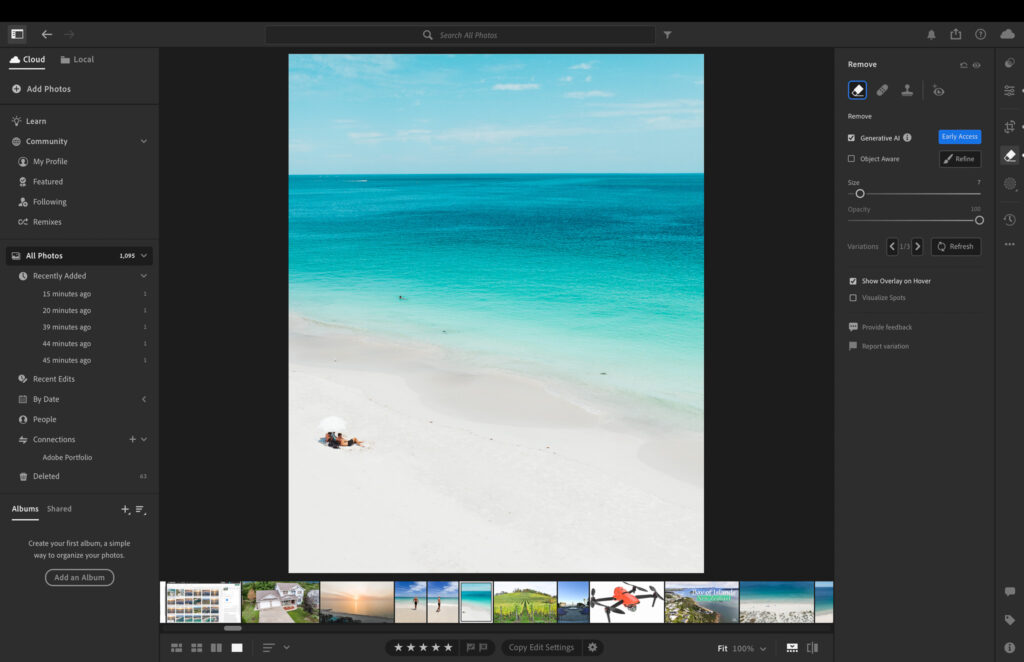
Removing unwanted subjects with just a couple of clicks with the AI erase tool is a game changer for editing pictures. By following these tips and tricks, you’ll be able to create polished and seamless drone photos that captivate your audience.
3. How to Use Adobe Premiere Pro
Premiere Pro has been my go to editing software since I started flying drones over six years ago. It has also seen an upgrade with amazing AI editing tools. Here are simple steps to use this powerful video editing machine.
- Import the videos you’d like to use by right clicking in the library box in the bottom left or clicking import at the top left
- Drag the videos across to the timeline in your preferred order
- Trim the videos to the desired length using the razor blade icon then click back to the pointer icon
- Click on each clip and go across to the right to lumetri color, then basic correction to edit the colours(learn to use lumetri scope whilst editing to get the most out of your clips)
- Import and drag in your favourite music from royalty free websites like Epidemic Sound (I like to time my clips with the music)
- Add text using the T icon, once you’ve typed your text on the screen head to the right to essential graphics to customise your text
- Head to the effects panel top right and search dip to black then add to the end of your last clip and alter to preferred length
- Export video using high quality settings, render at maximum depth
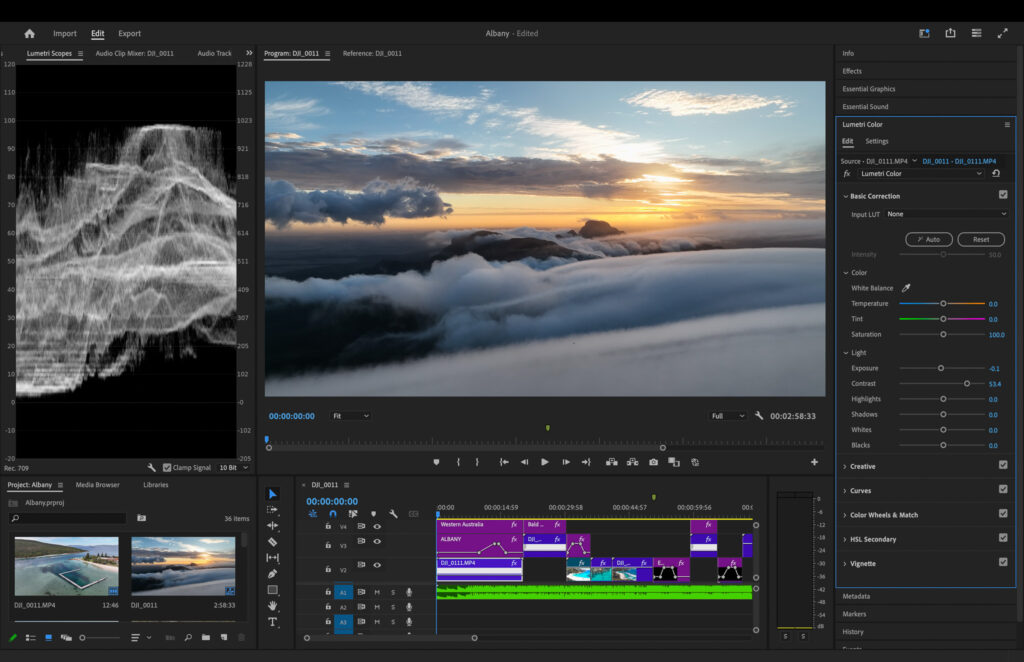
4. How to Use Final Cut Pro
Bring your drone videos to life with Final Cut Pro. A popular choice for Mac Users who want to get the most out of their computing power.
- Import by clicking on File > Import > Media, or use the shortcut Command + I.
- To start a new project, click on File > New > Project or use the Command + N shortcut.
- Import your drone footage into the project timeline by dragging and dropping it.
- Use the blade tool (shortcut B) to trim and organize your clips by cutting and removing unnecessary parts.
- Use the colour correction tools in Final Cut Pro, such as the colour wheels or colour curves, to adjust the exposure, contrast, and colour balance.
- Drag and drop a transition from the Effects Browser onto the cut between two clips in the timeline.
- Use the Effects Browser to browse and apply various filters and effects, such as blur, vignette, or film grain.
- Drag the music or audio file onto the timeline and adjust the volume levels as needed.
- Select the Text tool from the toolbar, click on the canvas, and type in your desired text. Customize the font, size, and position of the text as needed.
- Export your edited drone video by clicking on File > Share > Master File. Choose your desired export settings, such as resolution, format, and compression settings, and click on “Next” to save your video.
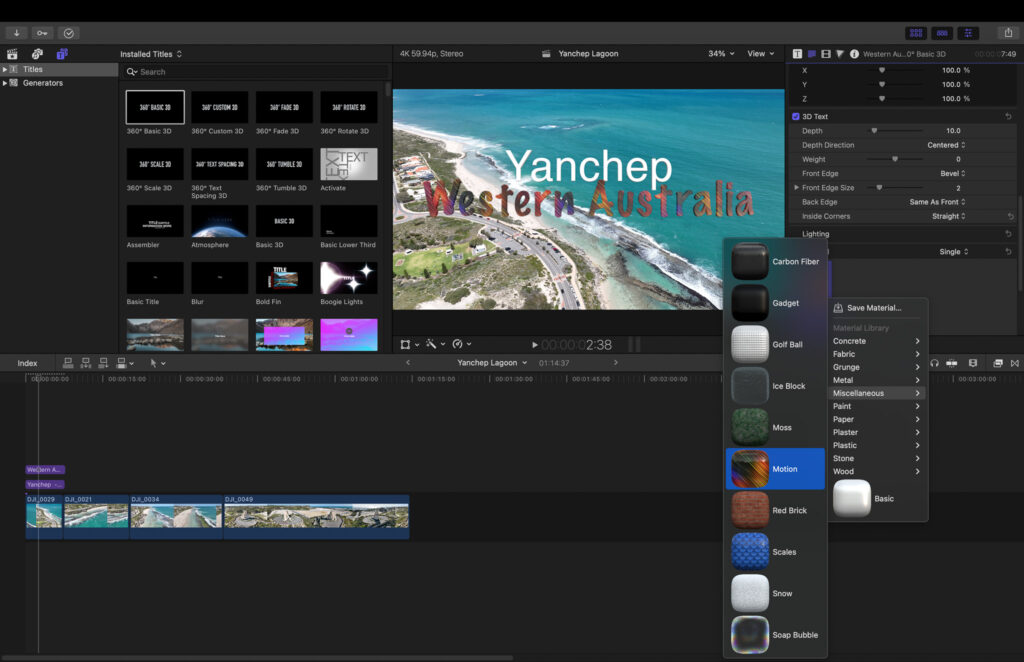
Remember to save your project regularly to avoid any data loss. Learning shortcuts can speed up your workflow.
Enjoy editing your drone videos in Final Cut Pro!
5. How to Use Divinci Resolve
Bring your vision to life with Davinci Resolve. Providing the tools and features to create stunning visuals and audio effects.
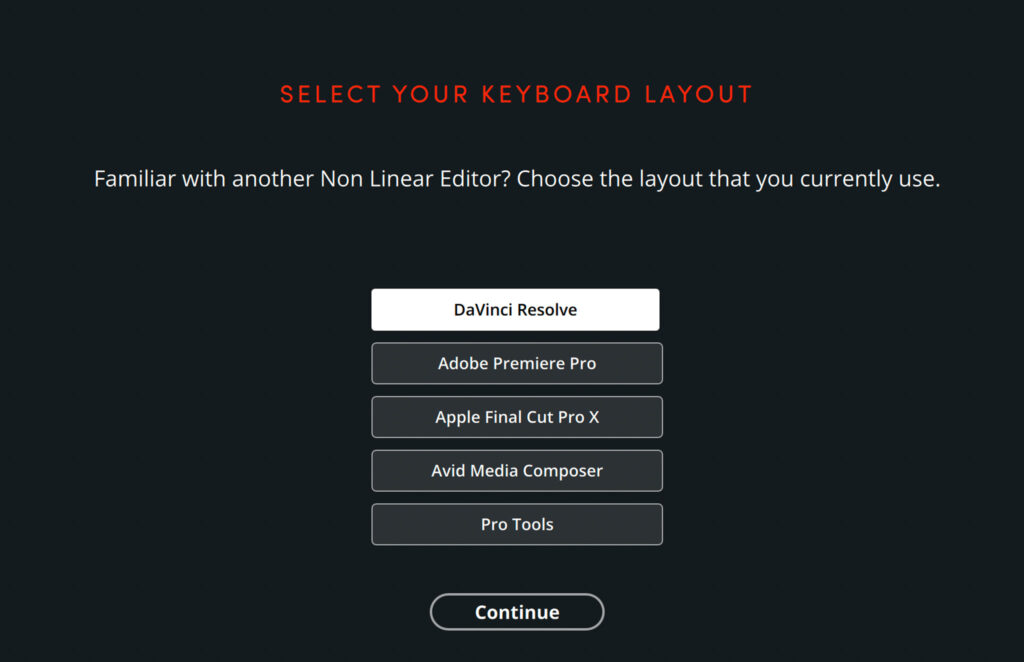
Use an alternate keyboard layout with DaVinci. Here are some simple steps on how to use this drone editing software
- To import your drone footage into DaVinci, go to the Media tab. Find your files, select them, and click “Import Selected.”
- To create a project, go to the File menu. Select “New Project” and adjust settings like resolution and frame rate.
- Drag and drop your imported drone footage into the Media Pool on the left side of the screen.
- Create a new timeline by clicking on the Edit tab at the bottom of the screen. Right-click in the empty timeline area and select “Create New Timeline.”
- Drag and drop your desired clips into the timeline.
- Go to the Color tab at the screen’s bottom. Use tools like color wheels, curves, and sliders to adjust exposure, contrast, and color balance.
- Click on the Edit tab at the bottom of the screen. Use the Effects Library on the right side of the screen to browse and apply various transitions, effects, and titles to your clips.
- Export your edited drone footage by clicking on the Deliver tab at the bottom of the screen. Choose your desired export settings, such as resolution, format, and compression settings. Then export.
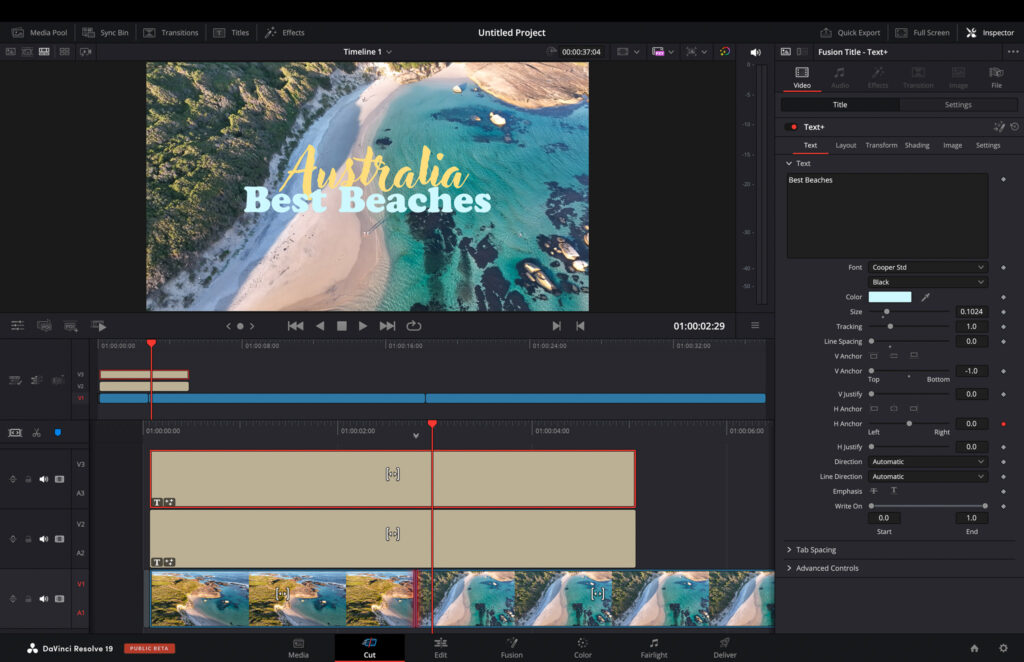
Watch YouTube tutorials to learn advanced editing skills. Enjoy editing your drone footage in DaVinci!
Adobe Software Apps
Adobe has a diverse range of software that seamlessly integrates. Some of the most popular Adobe products include Lightroom, Premiere Pro, Adobe Express and Photoshop.
Adobe Express is a great alternative to Canva and is great for making logos, banners and custom made graphics.
Premiere Pro Free Trial
You can download Premiere Pro here which comes with a free trial.
Conclusion
We are blessed in this day and age to have such powerful drone editing software as well as AI to do a lot of the work for us. Allowing us to create spectacular videos with just a few clicks.
For DJI owners LightCut is a must have on your mobile device for quick and easy edits. Lightroom is the go to software for editing drone photos whilst Premiere Pro is the go to professional video editing software for drone footage.
By mastering these programs, you can unlock your creative potential and produce stunning visuals that leave a lasting impression on your audience.
Frequently Asked Questions
Are there any Specific Requirements for a Computer to Run Drone Video Editing Software Smoothly?
To run drone video editing software smoothly, ensure your computer meets the software’s minimum requirements for RAM, CPU, and GPU. A dedicated graphics card with sufficient video memory, a fast processor, and ample RAM are essential for seamless editing performance.
Where Can I Edit Drone Footage for Free?
LightCut is one of the best options for editing drone footage on your mobile device for DJI users. It’s the recommended app from DJI and comes with all the typical editing features.
Which drone video editing software is best suited for beginners?
For beginners looking to edit DJI drone footage, LightCut is a recommended choice for its user-friendly interface and essential editing features. However, it is only available on mobile.
If you want to edit your drone footage for YouTube or any professional uses, then learning to use Premiere Pro would be well worth it to bring your drone videos to life.
