In today’s digital age, video is very popular. YouTube alone gets 2.5 billion users a month! That’s a lot of eyeballs. With so much video content being consumed, creators need to find ways to make their work stand out and engage viewers effectively.
One powerful tool in a video editor’s arsenal is text. Adding text to your videos can serve multiple purposes – from creating eye-catching titles and lower thirds to providing subtitles or emphasizing key points.
Adobe Premiere Pro, a leading video editing software, offers robust text and titling features that can help keep some of 2.5 billion eyeballs on your content. In this article I’ll walk you through how to add text in Premiere Pro.
Premiere Pro Free Trial
You can download Premiere Pro here which comes with a free trial.
Beginner’s Guide: How to Add Text in Premiere Pro
Let’s dive into the step by step guide on how to add text in Premiere Pro. We will then continue onto where to add text on your screen to add information and entertainment for the viewer.
1. Creating a New Text Layer
To begin, select the type tool (T) in the toolbar then position your mouse where you want the text box to appear. For Windows users, press Ctrl+T; Mac users, use Cmd+T. Click on the Program Monitor and start typing with your keyboard.
Pro Tip: For precise positioning, use the Essential Graphics panel to adjust the text’s width and alignment.
Consider placing text in areas of the frame with less movement or detail to ensure readability.
2. Styling Your Text
Step 1. add text in Premiere Pro, step 2. whilst highlighting the text go to the Essential Graphics panel. You will find many ways to customize your text. In the “Text” tab, pick your favourite font style from many options.
- Font: Choose a font that complements the mood of your footage. For sweeping landscapes, a clean sans-serif font like Helvetica can provide a modern, unobtrusive look. For more dramatic scenes, a bold serif font might be appropriate.
- Size and Scaling: Adjust the text size to ensure it’s readable even on smaller screens. Remember, what looks good on your editing monitor might be too small on a mobile device.
- Color and Contrast: Select text colors that stand out against your footage. For instance, if you’re showcasing a lush forest canopy, white or light yellow text might pop nicely against the green backdrop.
- Effects for Emphasis: Use drop shadows or outer glows to make your text legible over varying backgrounds. This is particularly useful for drone footage where the background can change rapidly.
3. How to Add Text Templates
If you are feeling lazy or you are in a rush then you can add text templates and skip most of these steps.
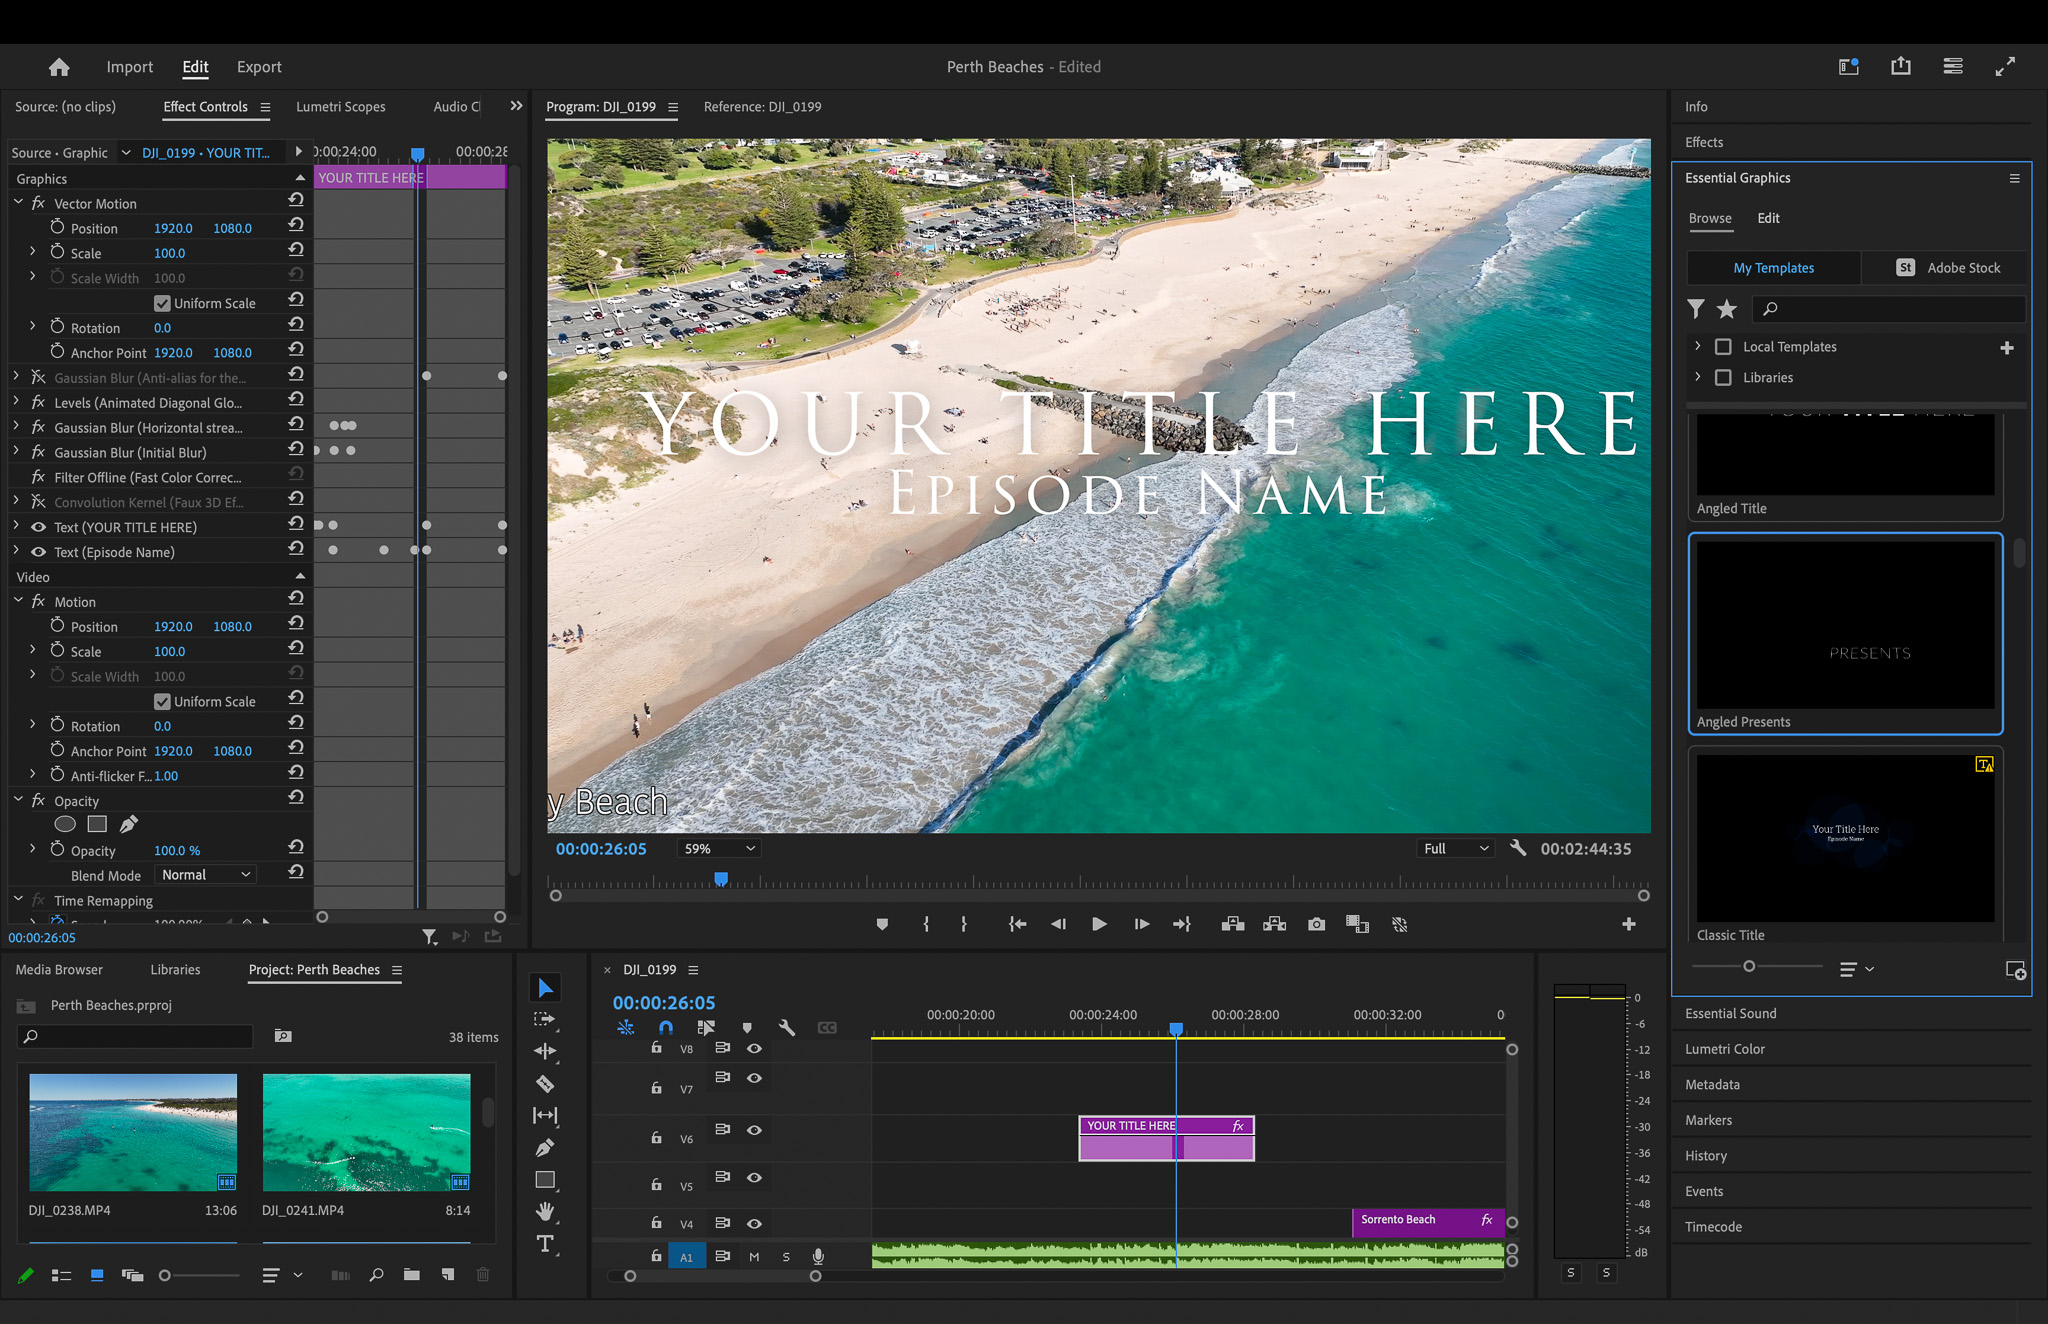
- Open the Essential Graphics panel (Window > Essential Graphics).
- Click on the “Browse” tab at the top of the panel.
- You’ll see a variety of pre-installed templates. Scroll through or use the search bar to find a suitable template.
- To preview a template, hover over it and click the play button that appears.
- Once you’ve chosen a template, drag and drop it onto your timeline(not the screen) at the desired position.
- With the template selected in your timeline, use the Essential Graphics panel’s “Edit” tab to customize the text, colors, and other properties.
- Adjust the duration of the template in your timeline by dragging its edges.
You can also use Adobe Stock to import premium text templates.
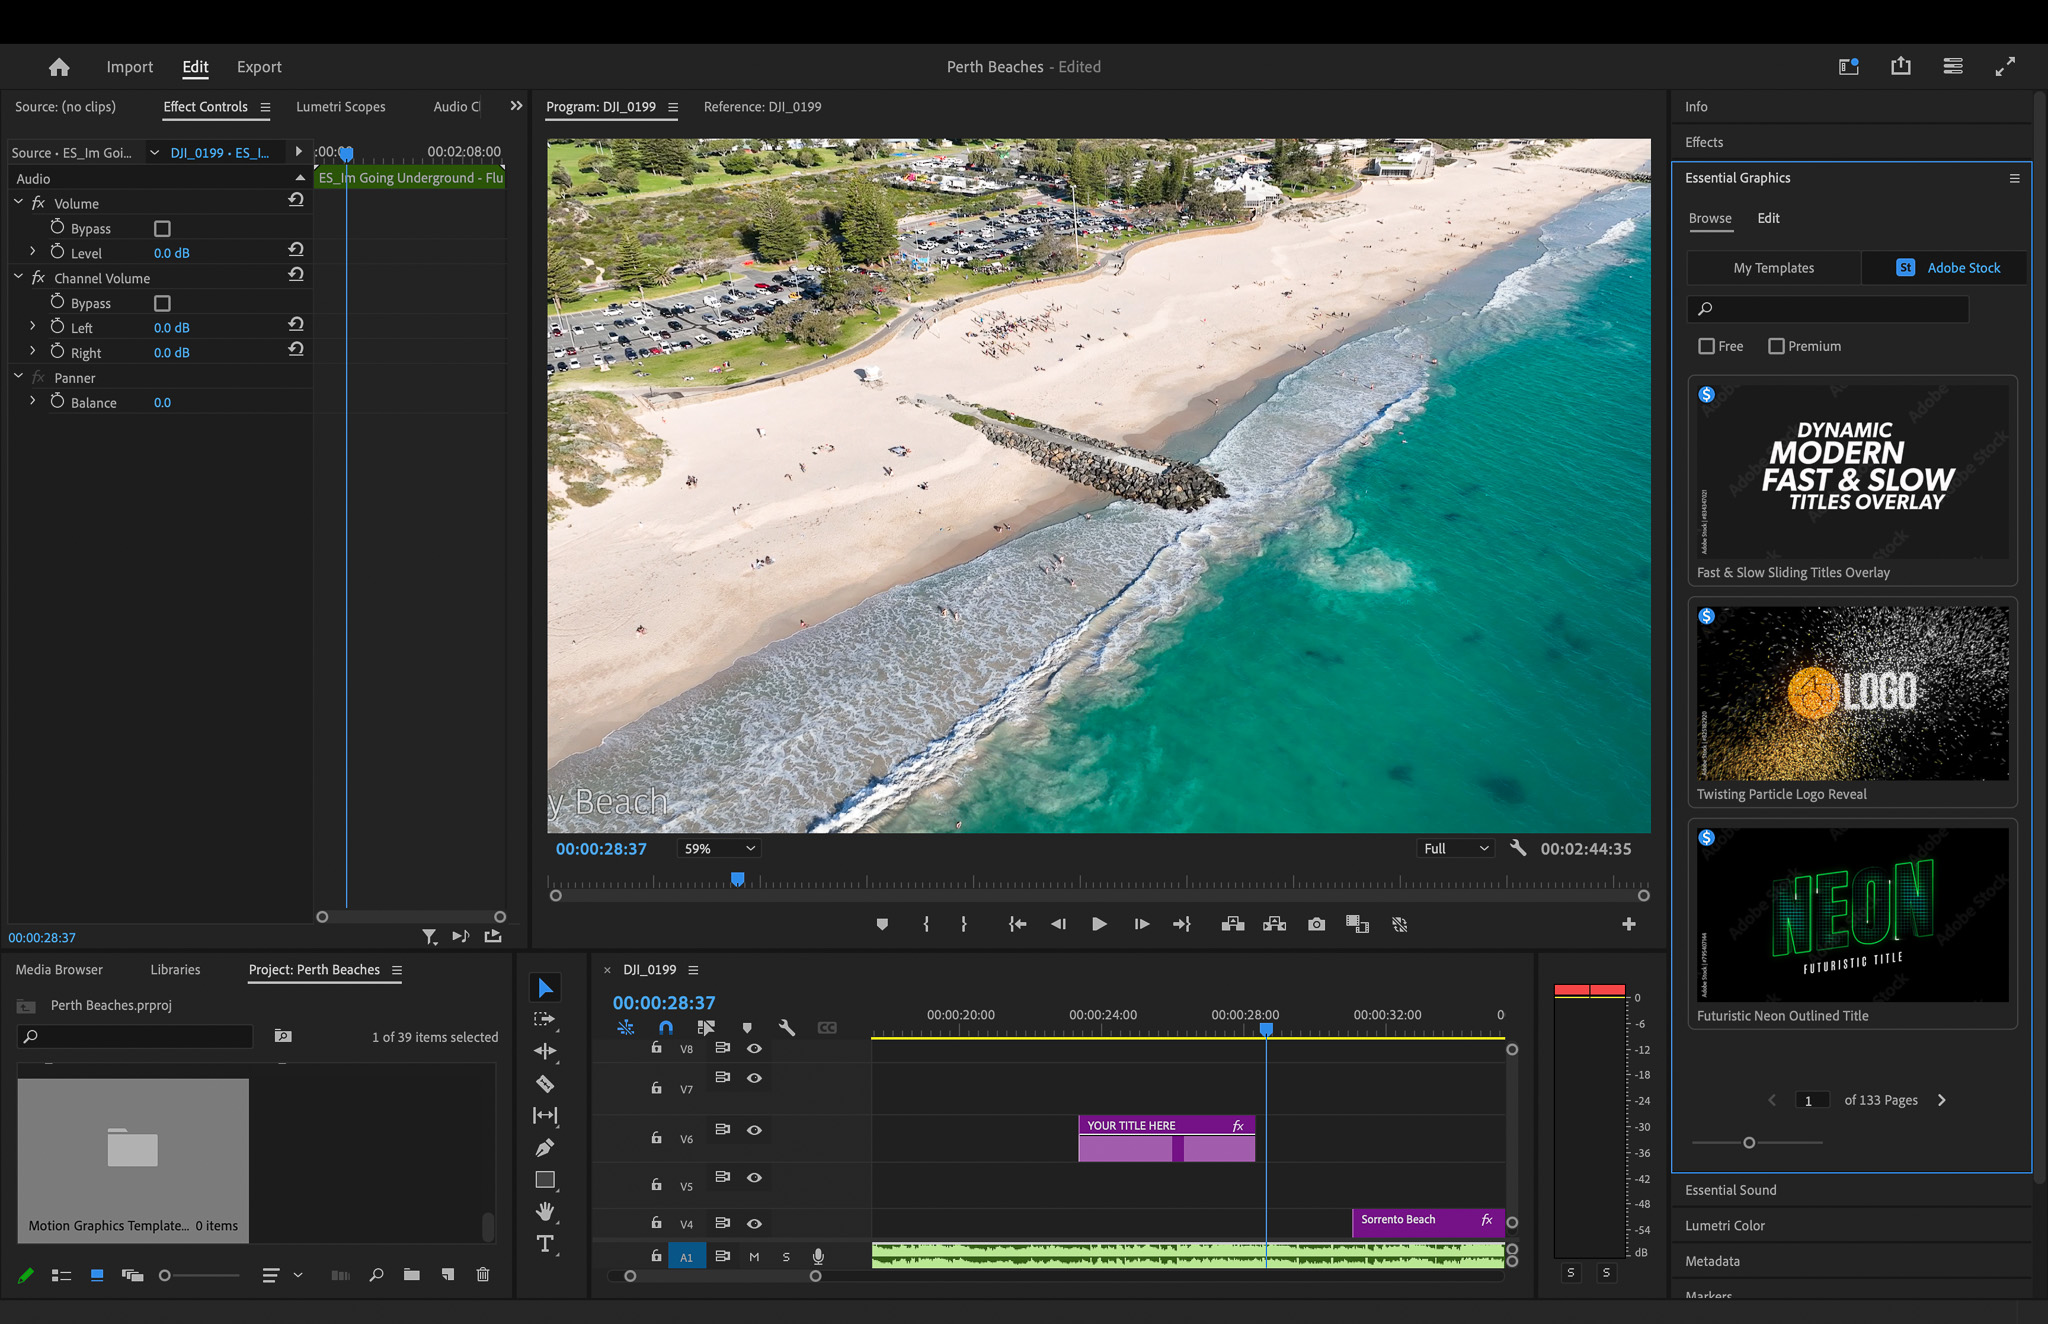
For custom or third-party templates:
- Click the “Install Motion Graphics Template” button at the bottom of the Browse tab.
- Navigate to and select the .mogrt file you want to install.
- The template will now appear in your “Local Templates” section, ready for use.
Remember, you can also create and save your own templates for future use by designing text in the Essential Graphics panel and clicking “Export as Motion Graphics Template.”
3. Animating Text
Static text has its place, but animated text can add a dynamic element to your videos:
- Position Animation: Create a simple fly-in effect by setting a starting position off-screen and animating it to its final position over a few frames.
- Opacity Fade: Gradually increase the opacity of your text to have it smoothly appear over your footage.
- Scale Animation: Have your text start small and grow to full size, drawing the viewer’s attention.
To achieve these effects:
- Select your text layer in the timeline.
- Open the Effect Controls panel.
- Click the stopwatch icon next to the property you want to animate (e.g., Position, Opacity, Scale).
- Move the mouse and adjust the property values to create keyframes.
Pro Tip: For drone footage, try matching your text animation to the movement of your shot. If your drone is ascending, have your text rise from the bottom of the frame.
4. Syncing Text with Spoken Words:
When adding narration to your footage, synchronizing text can reinforce your message:
- Use the Audio Track Mixer (Window > Audio Track Mixer) to isolate your narration track.
- Listen carefully and create markers (M key) at key points in the audio.
- Add text layers that align with these markers, matching the spoken content.
For example, if your narration says, “As we soar over the Grand Canyon,” time your text to appear precisely as these words are spoken, enhancing the viewer’s engagement with both audio and visual elements.
5. Adjusting Duration:
The duration of your text is crucial for readability and impact:
- In the timeline, hover over the end of your text layer until you see the red bracket cursor.
- Click and drag to extend or shorten the duration.
- For frame-accurate adjustments, use the Trim tool (N key) and nudge the layer ends with the arrow keys.
Consider the complexity of your text and the speed of your drone footage. A simple location name might only need 2-3 seconds, while a more detailed description could require 5-7 seconds or more.
6. Creating Templates for Efficiency:
For consistency across your drone video series and saving time in Premiere Pro:
- Design your text style in the Essential Graphics panel.
- Click ‘New Motion Graphics Template’ in the panel menu.
- Name your template and save it to your local Creative Cloud library.
Now, in future projects, you can quickly apply this consistent style to new text elements, maintaining a professional look across all your videos.
7. Export Settings for Text-Heavy Videos:
When it’s time to share your masterpiece: I have gone into a deep into the best export settings for YouTube here.
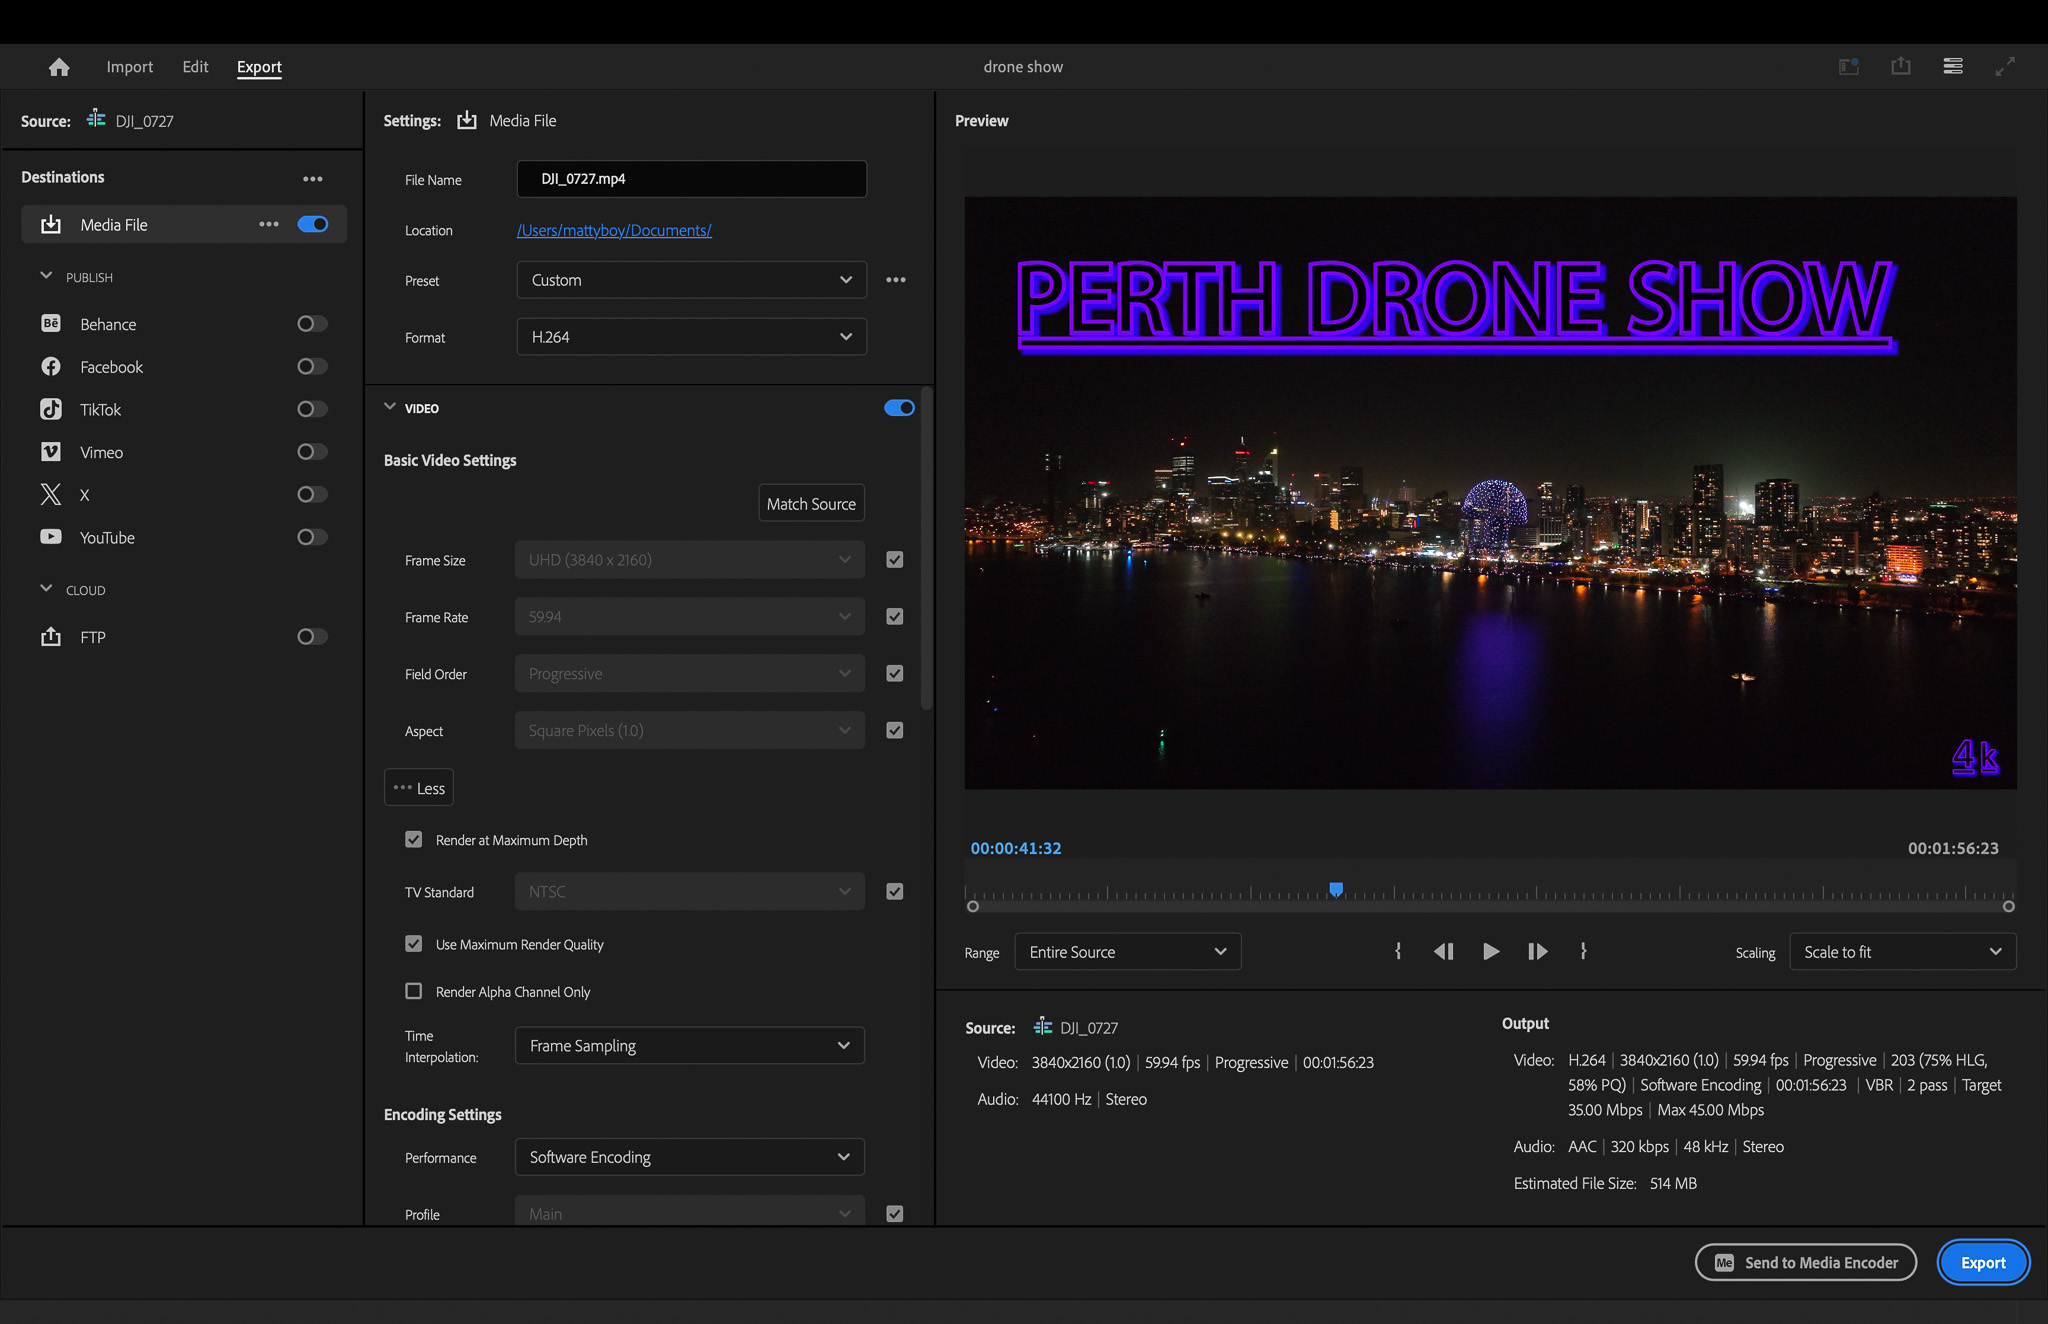
- Resolution: For crisp text, export at least at 1080p, preferably 4K if your footage allows.
- Bitrate: Aim for a high bitrate to prevent text from becoming pixelated during playback. For 1080p, consider 10-20 Mbps; for 4K, 35-45 Mbps or higher.
- Format: H.264 is widely compatible and offers good quality-to-file size ratio.
- For the highest quality, consider ProRes or DNxHD, especially if you’re delivering to clients.
To export, use the shortcut Ctrl+M (Windows) or Cmd+M (Mac), then carefully select your settings in the Export Settings dialog.
Where to Add Text to your Videos
Now you know how to add text in Premiere Pro, lets discuss the spots where you can place your text to help inform and entertain the viewer.
Adding text strategically in Premiere Pro can significantly enhance your video’s impact. Here are some key places to consider:
1. Opening Titles
Grab attention right from the start with a dynamic title sequence. Use the beginning of your video to introduce your topic or brand with bold, animated text that sets the tone for what’s to come.
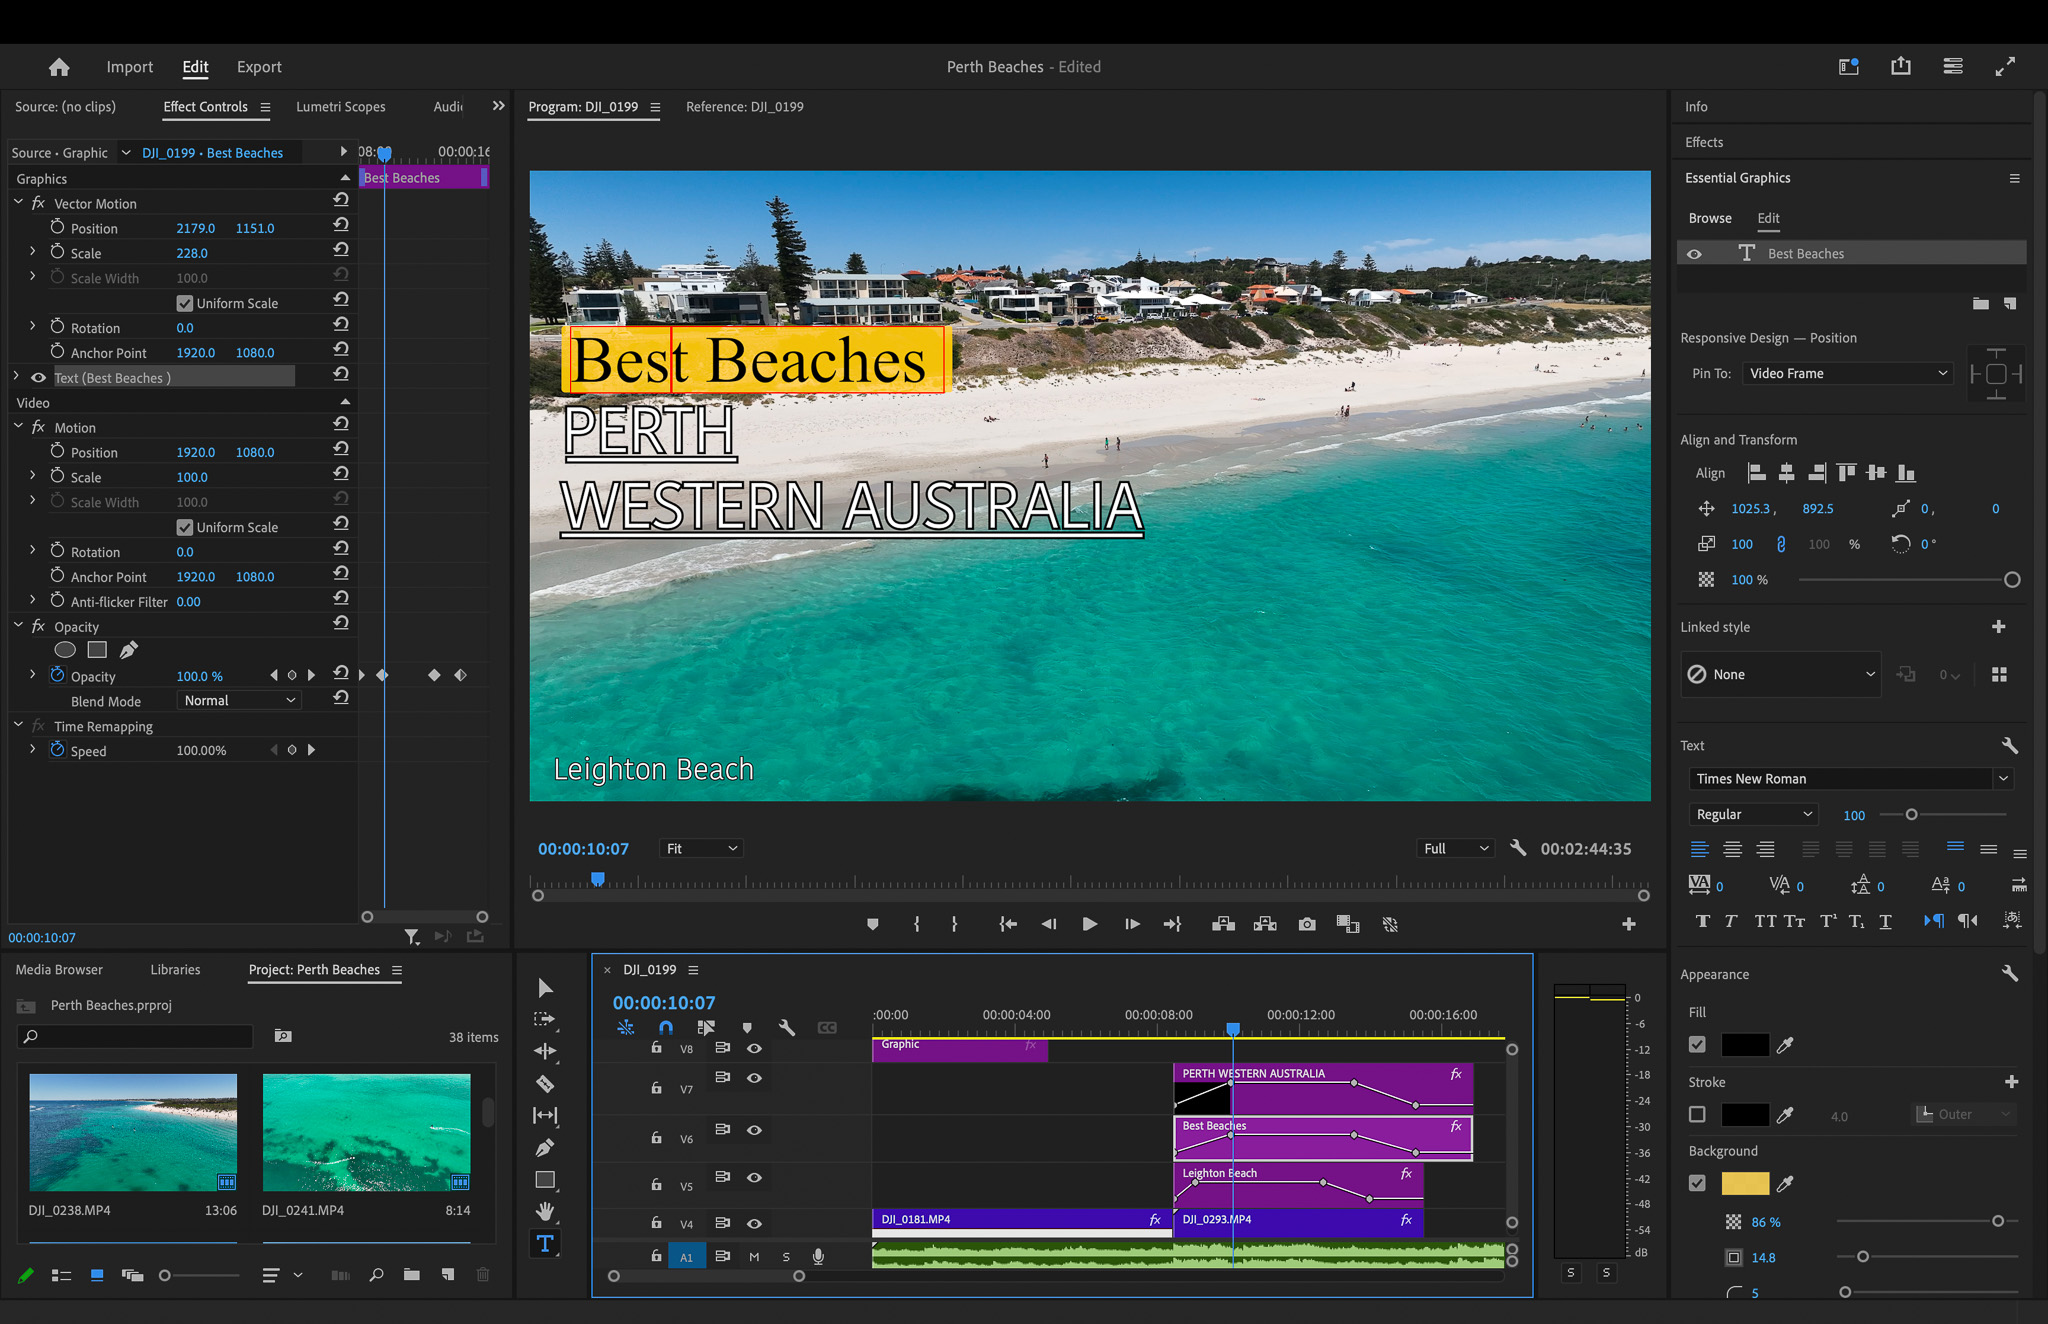
2. Lower Thirds
These text overlays, typically placed in the bottom third of the screen, are perfect for introducing speakers or providing brief context. They’re especially useful in interview-style videos or documentaries.
I use them to introduce a new location within my video.

3. Callouts
Highlight specific details in your footage by adding text near points of interest. This works great for tutorials or when you want to draw attention to particular elements in a scene.
4. Subtitles and Captions
Improve accessibility and engage viewers who watch without sound by adding subtitles. Place them at the bottom of the frame, ensuring they’re easily readable without obscuring important visual elements.
5. Animated Statistics
Bring numbers to life by animating text that represents statistics or data. This can be particularly effective in informational videos or when you want to emphasize growth or change over time.
6. End Screens
Use the end of your video to reinforce key messages or call viewers to action. Add text prompts for subscribing, visiting a website, or watching related content.
7. Kinetic Typography
For a more dynamic approach, animate your text to move with the rhythm of your video or audio. This can be especially entertaining in music videos or high-energy promotional content.
Remember, the key is to use text sparingly and purposefully. Each text element should add value to your video, enhancing the viewer’s understanding or enjoyment without becoming a distraction.
How Can Text in Video Content Improve Engagement
Text in video content is not just a bunch of words on a screen. It is a strong way to talk to people and keep them engaged. If you make films or love social media, knowing how to use text smartly can make your videos much better.
A lot of people watch online videos without sound. So, subtitles and captions are now a must instead of just nice extras.
Using text in your videos helps reach a wider audience. This includes people who are deaf or hard of hearing and those who like to watch videos quietly in public. Also, good text overlays can highlight important points, give context to the visuals, and make watching the video more enjoyable.
Enhancing Viewer Engagement Through Text
Want to catch your audience’s eye and keep them watching? Using text layers in smart ways can help! Attention-grabbing titles, strong quotes, and even gentle text animations can really boost viewer interest.
Think of text as a way to repeat what is said or to showcase important points. Text can remind viewers of key details that they might have missed or stress an important idea.
By using nice fonts, attractive colors, and fun animations, you can create a smooth and engaging look that makes your audience want to stay tuned in.
The Role of Text in Storytelling and Information Sharing
Text is a storyteller’s best friend. It gives background, shows what characters are thinking, and helps guide viewers through the story. From the beginning titles that set up the scene to the ending credits that stay in your mind, text helps shape the way your story develops.
It is not only for fun. It is also about clear communication. In explainer videos, tutorials, and social media posts, text overlays become essential graphics. They help share information clearly and simply.
By using text in smart ways, you can show key points, explain tricky ideas, and make sure your message sticks with viewers after they finish watching.
Tips for Subtitles and Closed Captions
Subtitles and closed captions are important. They help you make your video content available to more people, including those who are deaf or hard of hearing. Adding these features not only increases your audience but also improves how viewers enjoy your video.
Here’s how to make and add subtitles in Premiere Pro. This approach ensures everything is clear, accurate, and provides a smooth experience for all viewers.
Creating Subtitles for Better Accessibility
Creating subtitles for your Premiere Pro projects is easy with the captioning tools. Just go to “Window”,”workspaces” and then click on “Captions” to open the Caption Editor. This tool helps you create, edit, and style your subtitles.
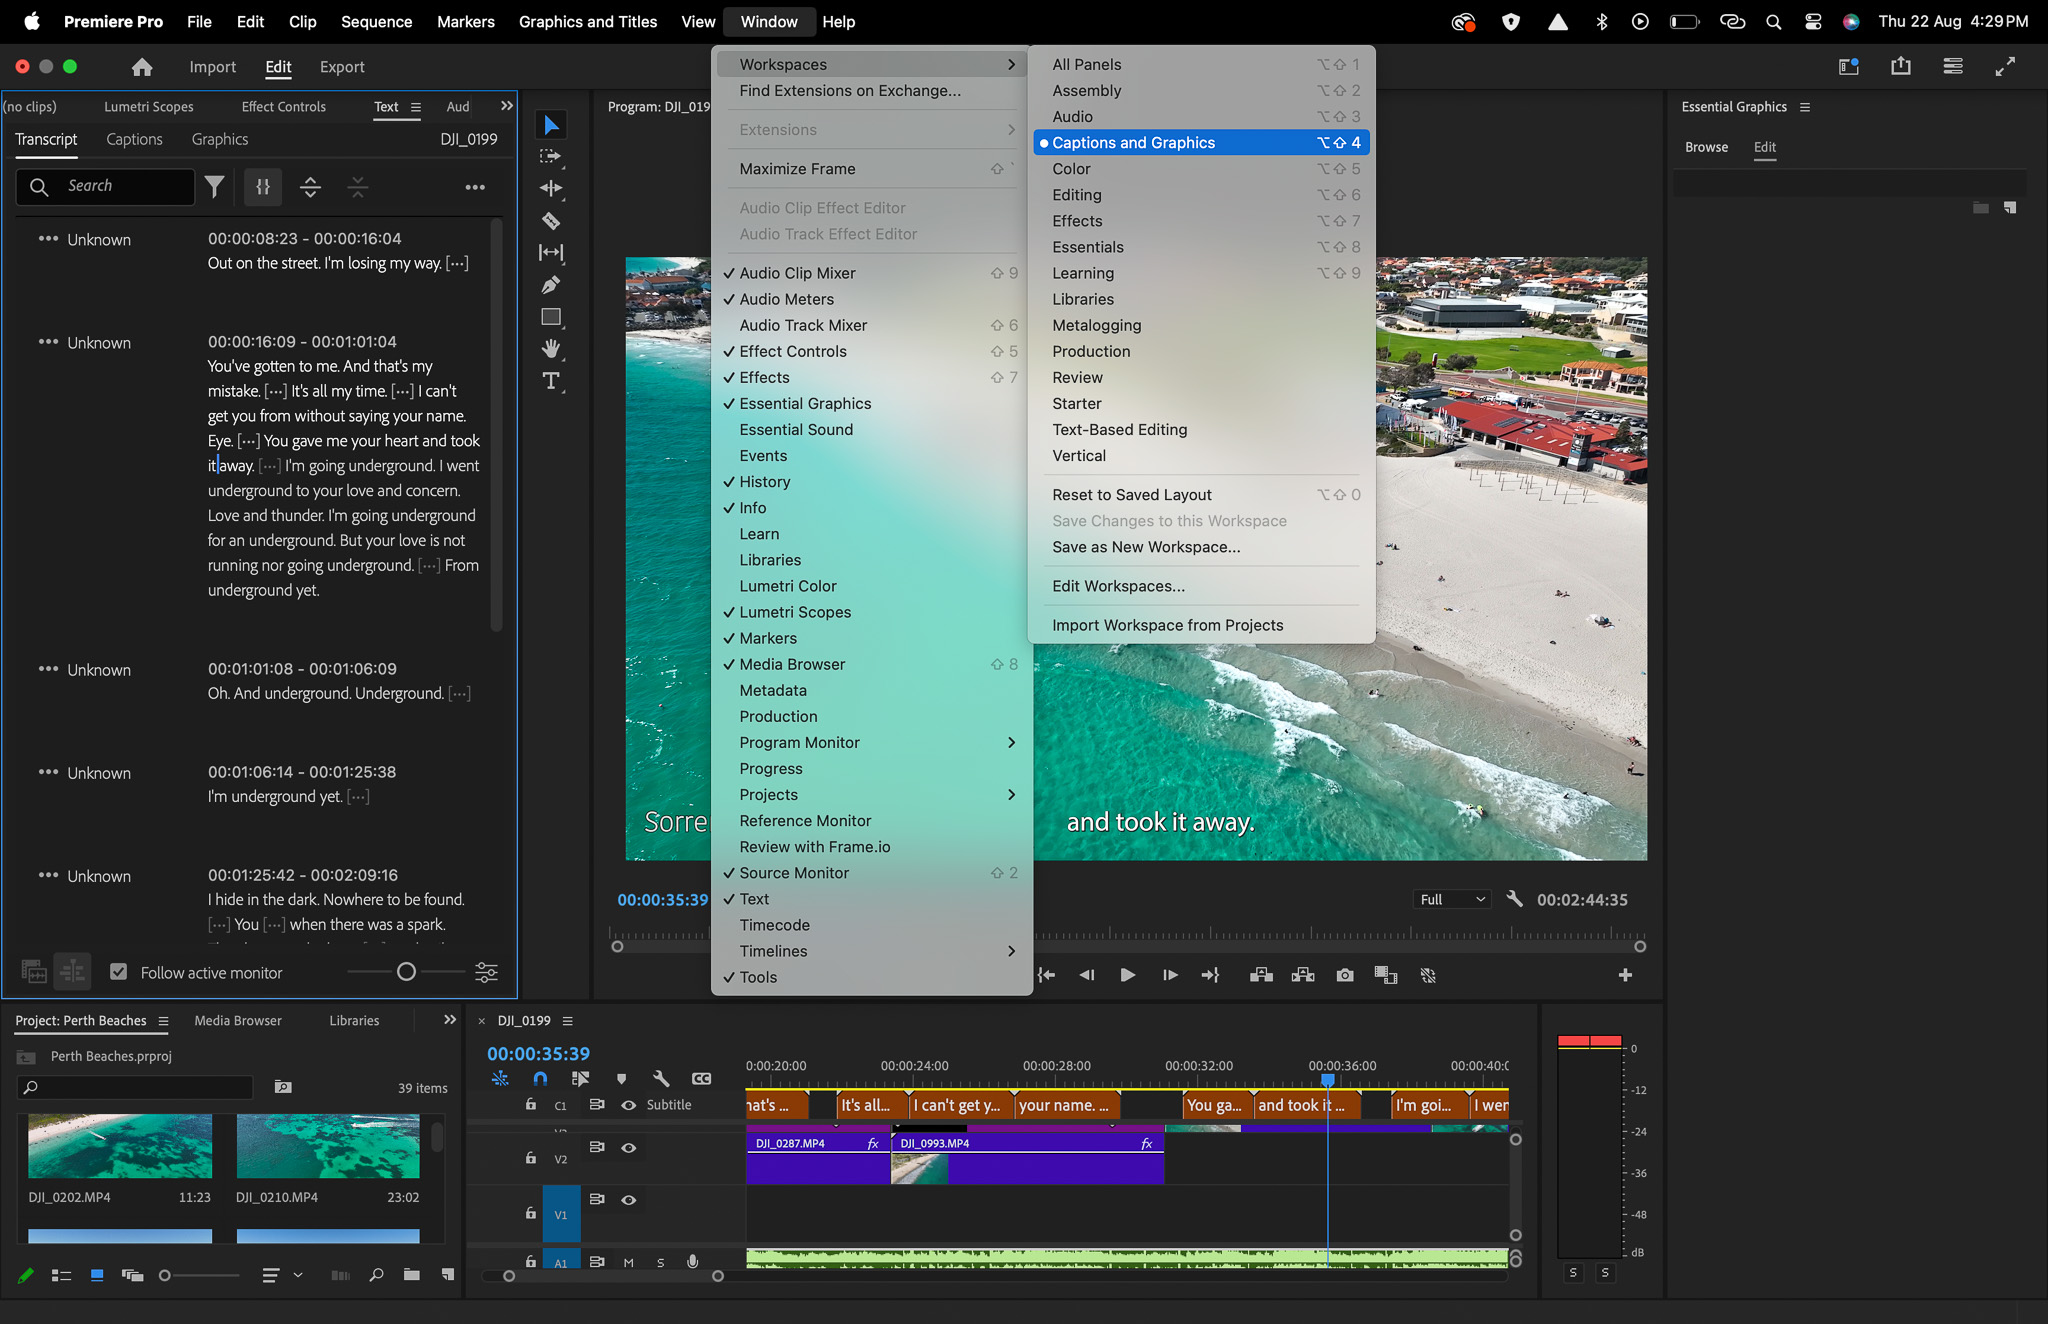
In Premiere Pro, you can choose between “Open Captions” that are always visible, and “Closed Captions” that viewers can turn on or off. After you make your choice, you can start writing down the audio of your video right in the Caption Editor.
Make sure your subtitles are correct, easy to read, and match the audio. Use a clear font that is easy to see. Also, keep your subtitles short so that viewers can read them comfortably in the time given.
Syncing Subtitles with Audio and Video
Accurate syncing of audio and video is very important for a smooth viewing experience. Premiere Pro has several ways to sync your subtitles:
- Manual Syncing: You can create and place your subtitles on the timeline to match the audio. This gives you control, but it can take a long time with longer videos.
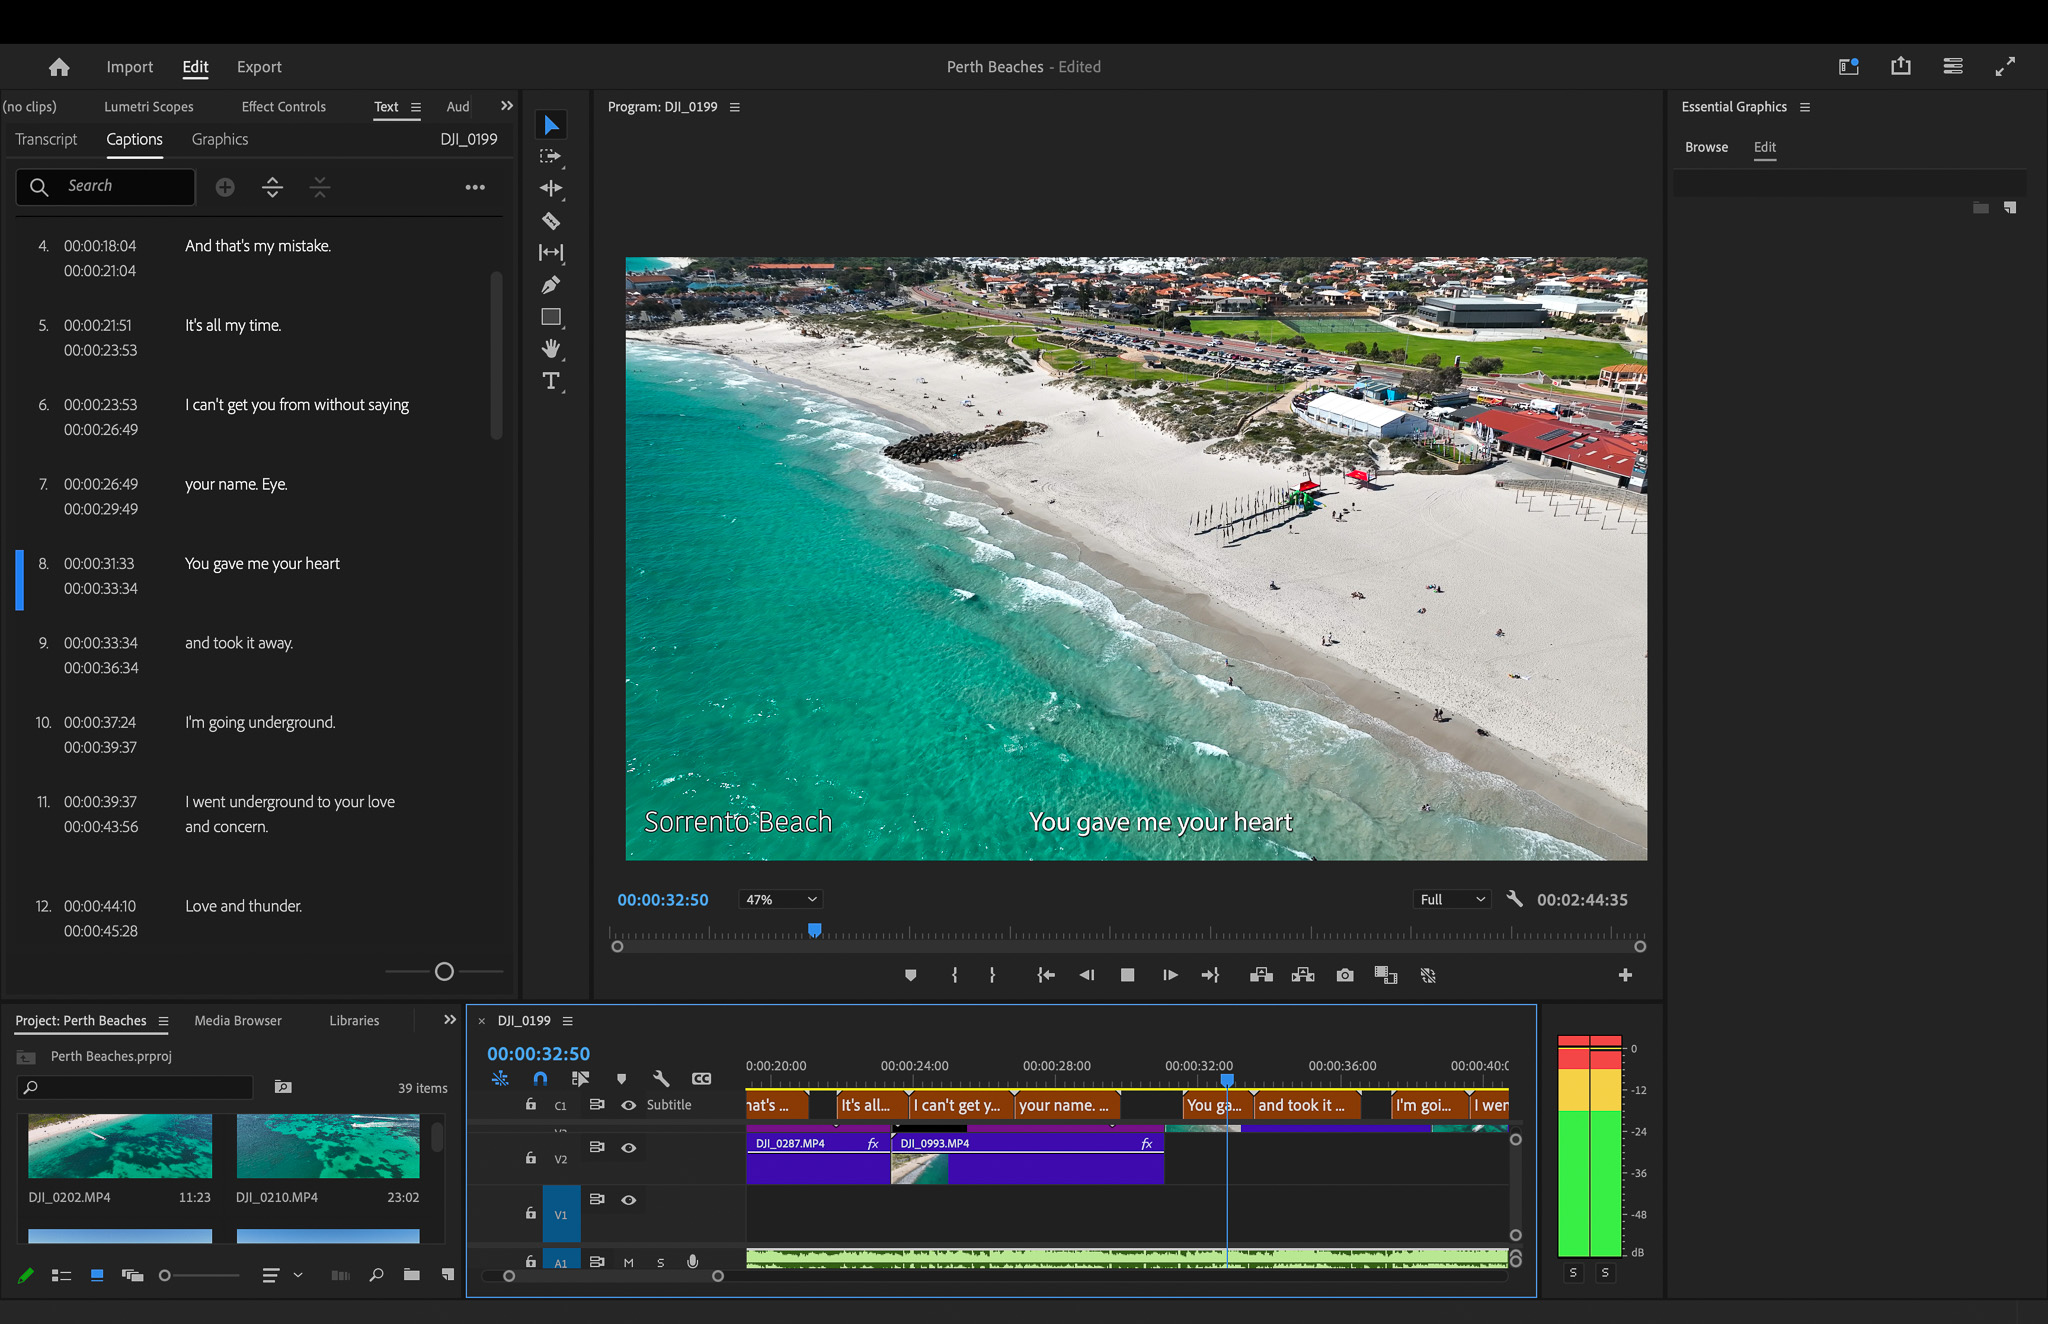
- Using Automated Transcripts: With the captions window open click on “create transcript”. Premiere Pro will then turn all the words in your audio(including songs) into words and add them to your timeline and screen.
- Speech-to-Text: You can use Premiere Pro’s built-in speech-to-text tool to create subtitles automatically from your video’s audio.
Conclusion
Adding text to your videos is an art form that balances information with aesthetics. Use text to provide context, emphasize key points, or simply add a professional touch to your aerial masterpieces.
Let your text complement, not overshadow. Using cool text effects and great titles can improve the quality of your video content.
Keep in mind that you should add text in Premiere Pro to help get your message across to your audience. So, be sure to use the power of text in your video editing to make your videos more engaging and professional-looking.
Frequently Asked Questions
What Are the Top 5 Shortcuts for Beginners?
For beginners using Premiere Pro, here are five useful shortcuts to know: Ctrl+S (Save), Ctrl+Z (Undo), Ctrl+C (Copy), Ctrl+V (Paste), and the Spacebar (Play/Pause). For Mac users replace the Ctrl with Command.
Using shortcuts in Premiere Pro can save you a lot of time and will help make your editing experience smoother.
Can I animate text to follow a moving object in Premiere Pro?
Sure! You can use keyframes and the “Track Motion” feature in Premiere Pro’s Effect Controls panel. This lets you animate text so it moves smoothly with any object in your video.
How to Fix Shaky Video?
Say goodbye to shaky videos with Premiere Pro’s great stabilization tools. Find the “Warp Stabilizer” effect in the Effects Panel. Just drag it onto your shaky video clip. Then, let Premiere Pro do its magic and smooth out any unwanted camera shakes.
What’s the Best Photo Editing Software?
Adobe Photoshop and Lightroom are two of the best for photo editing, while Premiere Pro is great for video. Photoshop has many strong tools and endless customization options. It helps you get the desired look for your images.
Whilst Photoshop has a lot of features, it can be overwhelming to learn. I have found Adobe Lightroom a lot easier to pick up and quickly edit my photos.
